
Fine-grained authorization (FGA) refers to the capability of granting individual users permission to perform particular actions on specific resources. Effective FGA systems enable the management of permissions for a large number of objects and users. These permissions can undergo frequent changes as the system dynamically adds objects and adjusts access permissions for its users.
OpenFGA is an open-source Relationship Based Access Control (ReBAC) system designed by Okta for developers, and adopted by the Cloud Native Computing Foundation (CNCF). It offers scalability and flexibility, and it also supports the implementation of RBAC and ABAC authorization models, moving authorization logic outside application code, making it simpler to evolve authorization policies as complexity grows. In this guide, you will learn how to secure a Spring Boot document API with Auth0 and integrate Fine-Grained Authorization (FGA) into the document operations with OpenFGA.

This tutorial was created with the following tools and services:
Add security with Auth0 and the Okta Spring Boot starter
Before working on the authorization (giving access to resources), you must define the mechanism for identifying the user. Auth0 is an easy-to-implement, adaptable authentication and authorization platform that allows you to implement authentication for any application in just minutes. With Auth0 CLI, you can create access tokens and use them to identify the user when making requests to the document API. Sign up at Auth0 and install the Auth0 CLI. Then, in the command line, run:
auth0 loginThe command output will display a device confirmation code and open a browser session to activate the device.
You don't need to create a client application at Auth0 for your API if you are not using opaque tokens. But you must register the API within your tenant; you can do it using Auth0 CLI:
auth0 apis create \
  --name "Document API" \
  --identifier https://document-api.okta.com \
  --offline-access=false
Leave scopes empty and default values when prompted.
Checkout the document API repository, which already implements basic request handling:
git clone https://github.com/indiepopart/spring-api-fga.gitThe repository contains two project folders, start and final. The bare bones document API is a Gradle project in the start folder; open it with your favorite IDE. Add the okta-spring-boot-starter dependency:
// build.gradle
dependencies {
    ...
    implementation 'com.okta.spring:okta-spring-boot-starter:3.0.6'
    ...
}
As the document-api must be configured as an OAuth2 resource server, add the following properties to application.yml
# application.yml
okta:
  oauth2:
    issuer: https://<your-auth0-domain>/
    audience: https://document-api.okta.com
You can find your Auth0 domain with the following Auth0 CLI command:
auth0 tenants listRun the API with:
./gradlew bootRunTest the API authorization with curl:
curl -i localhost:8080/documentYou will get HTTP response code 401 because the request requires bearer authentication. Using Auth0 CLI, get an access token:
auth0 test token -a https://document-api.okta.com -s openidSelect any available client when prompted. You also will be prompted to open a browser window and log in with a user credential. You can sign up as a new user using an email and password or using the Google social login.
With curl, send a request to the API server using a bearer access token:
ACCESS_TOKEN=<auth0-access-token> && \
  curl -i --header "Authorization: Bearer $ACCESS_TOKEN" localhost:8080/document
You should get a JSON response listing the available documents:
[
   {
      "id":1,
      "parentId":null,
      "ownerId":"test-user",
      "name":"planning-v0",
      "description":"Planning doc",
      "createdTime":"2024-05-03T11:48:35.617694826",
      "modifiedTime":"2024-05-03T11:48:35.617694826",
      "quotaBytesUsed":null,
      "version":null,
      "originalFilename":null,
      "fileExtension":".doc"
   },
   {
      "id":2,
      "parentId":null,
      "ownerId":"test-user",
      "name":"image-1",
      "description":"Some image",
      "createdTime":"2024-05-03T11:48:35.617694826",
      "modifiedTime":"2024-05-03T11:48:35.617694826",
      "quotaBytesUsed":null,
      "version":null,
      "originalFilename":null,
      "fileExtension":".jpg"
   },
   {
      "id":3,
      "parentId":null,
      "ownerId":"test-user",
      "name":"meeting-notes",
      "description":"Some text file",
      "createdTime":"2024-05-03T11:48:35.617694826",
      "modifiedTime":"2024-05-03T11:48:35.617694826",
      "quotaBytesUsed":null,
      "version":null,
      "originalFilename":null,
      "fileExtension":".txt"
   }
]
Define an Authorization Model
At a high level, an authorization model is defined by indicating user types, object types, and relationships between them. As we are not going to deep-dive on ReBAC in this guide, you can refer to OpenFGA documentation for learning about modeling concepts. Under the Advanced use-cases section in the doc, there is a simplified authorization model for a Google Drive application ready to test:
model
  schema 1.1

type user

type document
  relations
    define owner: [user, domain#member] or owner from parent
    define writer: [user, domain#member] or owner or writer from parent
    define commenter: [user, domain#member] or writer or commenter from parent
    define viewer: [user, user:*, domain#member] or commenter or viewer from parent
    define parent: [document]

type domain
  relations
    define member: [user]
The graph below is a model preview generated by the OpenFGA playground where you can see the direct and implied relations of the model.

The OpenFGA authorization model is expressed in a configuration language that can be presented in DSL or JSON syntax. The API accepts the JSON syntax. The DSL adds syntactic sugar on top of JSON for ease of use and can be transformed to JSON using the FGA CLI. The syntax above is the document authorization model in DSL. Copy the model DSL from above to the file src/main/resources/fga/auth-model.fga file, install the FGA CLI, and transform the model to JSON:
fga model transform --file=auth-model.fga > auth-model.jsonThe transformed model should be like the JSON below:
// auth-model.json
{
   "schema_version":"1.1",
   "type_definitions":[
      {
         "type":"user"
      },
      {
         "metadata":{...},
         "relations":{...},
         "type":"document"
      },
      {
         "metadata":{...},
         "relations":{...},
         "type":"domain"
      }
   ]
}
Place the file at src/main/resources/fga/auth-model.json as it will be required later.
Add Fine-Grained Authorization (FGA) with OpenFGA
Now, let's integrate fine-grained authorization into the application. The OpenFGA team has just released the OpenFGA Spring Boot Starter 0.0.1, and you can add it to your project with the following dependency:
implementation 'dev.openfga:openfga-spring-boot-starter:0.0.1'The OpenFGA Spring Boot Starter dependency provides the auto-configuration of an FGA client and FGA bean that exposes a check method for authorizing operations. Before adding method-security, let's add the changes required to create the owner tuple when the document is created. Create an AuthorizationService in the package com.example.demo.service:
// src/main/java/com/example/demo/service/AuthorizationService.java
package com.example.demo.service;

import com.example.demo.model.Permission;
import dev.openfga.sdk.api.client.OpenFgaClient;
import dev.openfga.sdk.api.client.model.ClientTupleKey;
import dev.openfga.sdk.api.client.model.ClientWriteResponse;
import dev.openfga.sdk.errors.FgaInvalidParameterException;
import org.springframework.stereotype.Service;

import java.util.List;
import java.util.concurrent.ExecutionException;

@Service
public class AuthorizationService {

    private OpenFgaClient fgaClient;

    public AuthorizationService(OpenFgaClient fgaClient) {
        this.fgaClient = fgaClient;
    }

    public void create(Permission permission) {
        try {
            ClientTupleKey tuple = new ClientTupleKey()
                    .user("user:" + permission.getUserId())
                    .relation(permission.getRelation())
                    ._object("document:" + permission.getDocumentId());
            ClientWriteResponse response = fgaClient.writeTuples(List.of(tuple)).get();
        } catch (FgaInvalidParameterException | InterruptedException | ExecutionException e) {
            throw new AuthorizationServiceException("Unexpected error", e);
        }
    }
}
Add the exception class in the package com.example.demo.service:
// src/main/java/com/example/demo/service/AuthorizationServiceException.java
package com.example.demo.service;

public class AuthorizationServiceException extends RuntimeException {
    public AuthorizationServiceException(Exception e) {
        super(e);
    }

    public AuthorizationServiceException(String message, Exception e) {
        super(message, e);
    }
}
Update the DocumentService.save() method for the required dual write (database and OpenFGA server) when creating a Document:
// src/main/java/com/example/demo/service/DocumentService.java
package com.example.demo.service;

import com.example.demo.model.Document;
import com.example.demo.model.DocumentRepository;
import com.example.demo.model.Permission;
import com.example.demo.model.PermissionBuilder;
import jakarta.transaction.Transactional;
import org.springframework.security.access.prepost.PreAuthorize;
import org.springframework.security.core.parameters.P;
import org.springframework.stereotype.Service;

import java.util.List;
import java.util.Optional;

@Service
public class DocumentService {

    private DocumentRepository documentRepository;

    private AuthorizationService authorizationService;

    public DocumentService(DocumentRepository documentRepository, AuthorizationService authorizationService) {
        this.documentRepository = documentRepository;
        this.authorizationService = authorizationService;
    }

    @Transactional
    public Document save(@P("document") Document document) {
        try {
            Document result = documentRepository.save(document);
            Permission permission = new PermissionBuilder()
                    .withDocumentId(result.getId())
                    .withRelation("owner")
                    .withUserId(result.getOwnerId())
                    .build();
            authorizationService.create(permission);
            return result;
        } catch(Exception e){
            throw new DocumentServiceException("Unexpected error", e);
        }
    }
...
}
Annotate the DocumentApiApplication with @EnableTransactionManagement and @EnableGlobalMethodSecurity:
package com.example.demo;

import org.springframework.boot.SpringApplication;
import org.springframework.boot.autoconfigure.SpringBootApplication;
import org.springframework.security.config.annotation.method.configuration.EnableGlobalMethodSecurity;
import org.springframework.transaction.annotation.EnableTransactionManagement;

@SpringBootApplication
@EnableGlobalMethodSecurity(prePostEnabled = true)
@EnableTransactionManagement
public class DocumentApiApplication {

    public static void main(String[] args) {
        SpringApplication.run(DocumentApiApplication.class, args);
    }

}
With the approach above, the Document will not be saved if the permission tuple cannot be created, and this prevents having an entity without permission.
Next, you need to add method-security enforcing the permissions policy. With @PreAuthorize and @fga.check, you can express the permissions required for each operation. For example, the save operation can be guarded as follows:
@PreAuthorize("#document.parentId == null or @fga.check('document', #document.parentId, 'writer', 'user')")
public Document save(@P("document") Document document)
The expression will produce a call to OpenFGA that will check if the authenticated user is a writer of the parent document when the parentId is not null. Assuming the parent is a folder, the document can be created in the folder if the user is a writer (has write permission) for that folder. The complete method-security can be expressed as follows:
// src/main/java/com/example/demo/service/DocumentService.java
package com.example.demo.service;

import com.example.demo.model.Document;
import com.example.demo.model.DocumentRepository;
import com.example.demo.model.Permission;
import com.example.demo.model.PermissionBuilder;
import jakarta.transaction.Transactional;
import org.springframework.security.access.prepost.PreAuthorize;
import org.springframework.security.core.parameters.P;
import org.springframework.stereotype.Service;

import java.util.List;
import java.util.Optional;

@Service
public class DocumentService {

    private DocumentRepository documentRepository;

    private AuthorizationService authorizationService;

    public DocumentService(DocumentRepository documentRepository, AuthorizationService authorizationService) {
        this.documentRepository = documentRepository;
        this.authorizationService = authorizationService;
    }

    @Transactional
    @PreAuthorize("#document.parentId == null or @fga.check('document', #document.parentId, 'writer', 'user')")
    public Document save(@P("document") Document document) {
        try {
            Document result = documentRepository.save(document);
            Permission permission = new PermissionBuilder()
                    .withDocumentId(result.getId())
                    .withRelation("owner")
                    .withUserId(result.getOwnerId())
                    .build();
            authorizationService.create(permission);
            return result;
        } catch(Exception e){
            throw new DocumentServiceException("Unexpected error", e);
        }
    }

    @PreAuthorize("@fga.check('document', #id, 'viewer', 'user')")
    public Optional<Document> findById(@P("id") Long id) {
        return documentRepository.findById(id);
    }

    @PreAuthorize("@fga.check('document', #id, 'owner', 'user')")
    public void deleteById(@P("id") Long id) {
        documentRepository.deleteById(id);
    }

    @PreAuthorize("@fga.check('document', #document.id, 'writer', 'user')")
    public Document update(@P("document") Document document){
        return documentRepository.save(document);
    }

    public List<Document> findAll() {
        return documentRepository.findAll();
    }
}NOTE: In this guide, OpenFGA tuples are not deleted when the document is deleted
In the previous section, you created an authorization model and converted it to JSON format. This will allow you to initialize the OpenFGA server in development with that model. Add the utility component OpenFGAUtil in the com.example.demo.initializer package:
// src/main/java/com/example/demo/initializer/OpenFGAUtil.java
package com.example.demo.initializer;

import com.fasterxml.jackson.databind.ObjectMapper;
import dev.openfga.sdk.api.model.AuthorizationModel;
import org.slf4j.Logger;
import org.slf4j.LoggerFactory;
import org.springframework.core.io.Resource;
import org.springframework.core.io.ResourceLoader;
import org.springframework.stereotype.Component;
import org.springframework.util.StreamUtils;

import java.io.IOException;
import java.nio.charset.Charset;

@Component
public class OpenFGAUtil {

    private static Logger logger = LoggerFactory.getLogger(OpenFGAUtil.class);

    private ResourceLoader resourceLoader;

    private ObjectMapper objectMapper;

    public OpenFGAUtil(ResourceLoader resourceLoader, ObjectMapper objectMapper) {
        this.resourceLoader = resourceLoader;
        this.objectMapper = objectMapper;
    }

    public AuthorizationModel convertJsonToAuthorizationModel(String path){
        try {
            Resource resource = resourceLoader.getResource(path);
            String json = StreamUtils.copyToString(resource.getInputStream(), Charset.defaultCharset());
            logger.debug(json);
            AuthorizationModel authorizationModel = objectMapper.readValue(json, AuthorizationModel.class);
            logger.debug(authorizationModel.toString());
            return authorizationModel;
        } catch (IOException e) {
            throw new RuntimeException(e);
        }
    }

}
The class OpenFGAUtil encapsulates the task of loading the JSON model into an AuthorizationModel object to build the write model request. Create the class OpenFGAInitializer with the following code:
// src/main/java/com/example/demo/initializer/OpenFGAInitializer.java
package com.example.demo.initializer;

import dev.openfga.sdk.api.client.OpenFgaClient;
import dev.openfga.sdk.api.model.*;
import org.slf4j.Logger;
import org.slf4j.LoggerFactory;
import org.springframework.boot.CommandLineRunner;
import org.springframework.boot.autoconfigure.condition.ConditionalOnProperty;
import org.springframework.stereotype.Component;

import java.util.concurrent.ExecutionException;

@Component
@ConditionalOnProperty(prefix = "openfga", name = "initialize", havingValue = "true")
public class OpenFGAInitializer implements CommandLineRunner {

    private Logger logger = LoggerFactory.getLogger(OpenFGAInitializer.class);

    private OpenFgaClient fgaClient;

    private OpenFGAUtil openFgaUtil;


    public OpenFGAInitializer(OpenFgaClient fgaClient, OpenFGAUtil openFgaUtil) {
        this.fgaClient = fgaClient;
        this.openFgaUtil = openFgaUtil;
    }

    @Override
    public void run(String... args) throws Exception {
        CreateStoreRequest storeRequest = new CreateStoreRequest().name("test");
        try {
            CreateStoreResponse storeResponse = fgaClient.createStore(storeRequest).get();
            logger.info("Created store: {}", storeResponse);
            fgaClient.setStoreId(storeResponse.getId());

            WriteAuthorizationModelRequest modelRequest = new WriteAuthorizationModelRequest();
            AuthorizationModel model = openFgaUtil.convertJsonToAuthorizationModel("classpath:fga/auth-model.json");
            modelRequest.setTypeDefinitions(model.getTypeDefinitions());
            modelRequest.setConditions(model.getConditions());
            modelRequest.setSchemaVersion(model.getSchemaVersion());
            WriteAuthorizationModelResponse modelResponse = fgaClient.writeAuthorizationModel(modelRequest).get();
            logger.info("Created model: {}", modelResponse);
            fgaClient.setAuthorizationModelId(modelResponse.getAuthorizationModelId());

        } catch (InterruptedException | ExecutionException e) {
            throw new RuntimeException("Error writing to FGA", e);
        }
    }
}
Before running the API, add some integration tests to verify the method's security. Add the following Testcontainers dependencies:
developmentOnly 'org.springframework.boot:spring-boot-docker-compose'
testImplementation "org.testcontainers:testcontainers:1.19.7"
testImplementation "org.testcontainers:openfga:1.19.7"
testImplementation "org.testcontainers:junit-jupiter:1.19.7"
testImplementation 'org.springframework.security:spring-security-test'
Then create the DocumentIntegrationTest class with the following code:
// src/main/java/com/example/demo/DocumentIntegrationTest.java
package com.example.demo;

import com.example.demo.model.Document;
import com.fasterxml.jackson.databind.ObjectMapper;
import org.junit.jupiter.api.BeforeEach;
import org.junit.jupiter.api.Test;
import org.springframework.beans.factory.annotation.Autowired;
import org.springframework.boot.test.context.SpringBootTest;
import org.springframework.http.MediaType;
import org.springframework.security.test.context.support.WithMockUser;
import org.springframework.test.context.DynamicPropertyRegistry;
import org.springframework.test.context.DynamicPropertySource;
import org.springframework.test.web.servlet.MockMvc;
import org.springframework.test.web.servlet.MvcResult;
import org.springframework.test.web.servlet.setup.MockMvcBuilders;
import org.springframework.web.context.WebApplicationContext;
import org.testcontainers.junit.jupiter.Container;
import org.testcontainers.junit.jupiter.Testcontainers;
import org.testcontainers.openfga.OpenFGAContainer;

import static org.springframework.security.test.web.servlet.request.SecurityMockMvcRequestPostProcessors.csrf;
import static org.springframework.security.test.web.servlet.request.SecurityMockMvcRequestPostProcessors.user;
import static org.springframework.security.test.web.servlet.setup.SecurityMockMvcConfigurers.springSecurity;
import static org.springframework.test.web.servlet.request.MockMvcRequestBuilders.*;
import static org.springframework.test.web.servlet.result.MockMvcResultMatchers.jsonPath;
import static org.springframework.test.web.servlet.result.MockMvcResultMatchers.status;

@SpringBootTest
@Testcontainers
public class DocumentIntegrationTest {

    @Container
    static OpenFGAContainer openfga = new OpenFGAContainer("openfga/openfga:v1.4.3");
    @Autowired
    private WebApplicationContext applicationContext;
    private MockMvc mockMvc;
    @Autowired
    private ObjectMapper objectMapper;

    @DynamicPropertySource
    static void registerOpenFGAProperties(DynamicPropertyRegistry registry) {
        registry.add("openfga.api-url", () -> "http://localhost:" + openfga.getMappedPort(8080));
    }

    @BeforeEach
    public void init() {
        this.mockMvc = MockMvcBuilders.webAppContextSetup(applicationContext)
                .apply(springSecurity()).build();
    }

    @Test
    @WithMockUser(username = "test-user")
    public void testCreateDocumentIsFobidden() throws Exception {

        Document document = new Document();
        document.setParentId(1L);
        document.setName("test-doc");
        document.setDescription("test-description");

        mockMvc.perform(post("/document").with(csrf())
                .contentType(MediaType.APPLICATION_JSON)
                .content(objectMapper.writeValueAsString(document)))
                .andExpect(status().isForbidden());
    }

    @Test
    @WithMockUser(username = "test-user")
    public void testCreateDocument() throws Exception {

        Document document = new Document();
        document.setName("test-doc");
        document.setDescription("test-description");

        MvcResult mvcResult = mockMvc.perform(post("/document")
                .with(csrf())
                .contentType(MediaType.APPLICATION_JSON)
                .content(objectMapper.writeValueAsString(document)))
                .andExpect(status().isOk()).andExpect(jsonPath("$").exists())
                .andExpect(jsonPath("$.name").value("test-doc"))
                .andExpect(jsonPath("$.description").value("test-description"))
                .andReturn();

        Document result = objectMapper.readValue(mvcResult.getResponse().getContentAsString(), Document.class);

        mockMvc.perform(get("/document/{id}", result.getId())
                .with(csrf())
                .contentType(MediaType.APPLICATION_JSON))
                .andExpect(status().isOk())
                .andExpect(jsonPath("$").exists())
                .andExpect(jsonPath("$.name").value("test-doc"))
                .andExpect(jsonPath("$.description").value("test-description"));
    }

    @Test
    @WithMockUser(username = "test-user")
    public void testDeleteDocument_NotOwned_AccessDenied() throws Exception {
        Document document = new Document();
        document.setName("test-doc");
        document.setDescription("test-description");

        MvcResult mvcResult = mockMvc.perform(post("/document")
                        .with(csrf())
                        .with(user("owner-user"))
                .contentType(MediaType.APPLICATION_JSON)
                .content(objectMapper.writeValueAsString(document)))
                .andExpect(status().isOk())
                .andExpect(jsonPath("$").exists())
                .andExpect(jsonPath("$.name").value("test-doc"))
                .andExpect(jsonPath("$.description").value("test-description"))
                .andReturn();

        Document result = objectMapper.readValue(mvcResult.getResponse().getContentAsString(), Document.class);

        mockMvc.perform(delete("/document/{id}", result.getId()).with(csrf())
                        .contentType(MediaType.APPLICATION_JSON))
                .andExpect(status().isForbidden());

    }
}
Update application.yml and add the following properties:
# src/main/resources/application.yml
openfga:
  api-url: http://localhost:8090
  store-id: 01AAAAAAAAAAAAAAAAAAAAAAAA
  authorization-model-id: 01AAAAAAAAAAAAAAAAAAAAAAAA
  initialize: true
Don't worry about the dummy store-id and authorization-model-id; in development, the initializer will create the store and authorization model and set them as default for the FGA operations.
Run the test with:
./gradlew test --tests com.example.demo.DocumentIntegrationTestRunning the Spring Boot API
Taking advantage of Spring Boot Docker, create a compose.yml file at the root of the project to start an OpenFGA server when the application runs:
# compose.yml
services:
  openfga:
    image: openfga/openfga:v1.5.3
    container_name: openfga
    command: run
    environment:
      - OPENFGA_DATASTORE_ENGINE=memory
      - OPENFGA_PLAYGROUND_ENABLED=true
    networks:
      - default
    ports:
      - "8090:8080" #http
      - "3000:3000" #playground
    healthcheck:
      test: ["CMD", "/usr/local/bin/grpc_health_probe", "-addr=openfga:8081"]
      interval: 5s
      timeout: 30s
      retries: 3
Notice the HTTP API port is mapped to host port 8090. Run the application with:
./gradlew bootRunYou should see in the application logs messages when the OpenFGA container is starting:
[Document API] [           main] .s.b.d.c.l.DockerComposeLifecycleManager : Using Docker Compose file '.../compose.yml'
[Document API] [utReader-stderr] o.s.boot.docker.compose.core.DockerCli   :  Container openfga  Recreate
[Document API] [utReader-stderr] o.s.boot.docker.compose.core.DockerCli   :  Container openfga  Recreated
[Document API] [utReader-stderr] o.s.boot.docker.compose.core.DockerCli   :  Container openfga  Starting
[Document API] [utReader-stderr] o.s.boot.docker.compose.core.DockerCli   :  Container openfga  Started
[Document API] [utReader-stderr] o.s.boot.docker.compose.core.DockerCli   :  Container openfga  Waiting
[Document API] [utReader-stderr] o.s.boot.docker.compose.core.DockerCli   :  Container openfga  Healthy
Create a new test token with Auth0 CLI:
auth0 test token -a https://document-api.okta.com -s openidWith curl, send a request to the API server using a bearer access token:
TOM_ACCESS_TOKEN=<auth0-access-token> && \
  curl -i -X POST \
    -H "Authorization:Bearer $TOM_ACCESS_TOKEN" \
    -H "Content-Type: application/json" \
    -d '{"name": "planning.doc"}' \
    http://localhost:8080/document
Verify the API does not authorize creating a document with a parent not owned:
curl -i -X POST \
  -H "Authorization:Bearer $TOM_ACCESS_TOKEN" \
  -H "Content-Type: application/json" \
  -d '{"name": "planning.doc", "parentId": 6}' \
  http://localhost:8080/document
The API will reject with HTTP 403:
HTTP/1.1 403
...
Access is denied%
Authorizing Access
You can remove the auth0.com cookie and, with the Auth0 CLI, create a new access token for a second user. Let's suppose this second user is ANA:
auth0 test token -a https://document-api.okta.com -s openidThen request a document owned by TOM with $ANA_ACCESS_TOKEN with the following command:
ANA_ACCESS_TOKEN=<auth0-access-token> && \
  curl -i -H "Authorization:Bearer $ANA_ACCESS_TOKEN" http://localhost:8080/document/4
Before creating the permission, the call will return HTTP code 403. Let's add a permission endpoint to grant writer access to ANA. Create a PermissionController class:
// src/main/java/com/example/demo/web/PermissionController.java
package com.example.demo.web;

import com.example.demo.model.Permission;
import com.example.demo.service.AuthorizationService;
import com.example.demo.service.AuthorizationServiceException;
import org.springframework.http.ResponseEntity;
import org.springframework.security.access.prepost.PreAuthorize;
import org.springframework.security.core.parameters.P;
import org.springframework.web.bind.annotation.ExceptionHandler;
import org.springframework.web.bind.annotation.PostMapping;
import org.springframework.web.bind.annotation.RequestBody;
import org.springframework.web.bind.annotation.RestController;

@RestController
public class PermissionController {

    private AuthorizationService authorizationService;

    public PermissionController(AuthorizationService authorizationService) {
        this.authorizationService = authorizationService;
    }

    // Only the owner can create permissions for the document
    @PostMapping("/permission")
    @PreAuthorize("@fga.check('document', #permission.documentId, 'owner', 'user')")
    public void createPermission(@P("permission") @RequestBody Permission permission) {
        authorizationService.create(permission);
    }

    @ExceptionHandler
    public ResponseEntity<String> handle(AuthorizationServiceException ex) {
        return ResponseEntity.status(500).body(ex.getMessage());
    }
}
Restart the server. Find out ANA's userId with:
curl -i -H "Authorization:Bearer $ANA_ACCESS_TOKEN" http://localhost:8080/greetingThen, in the command below, replace <user-id> with ANA's userId and create the writer permission using $TOM_ACCESS_TOKEN, as TOM is the document's owner:
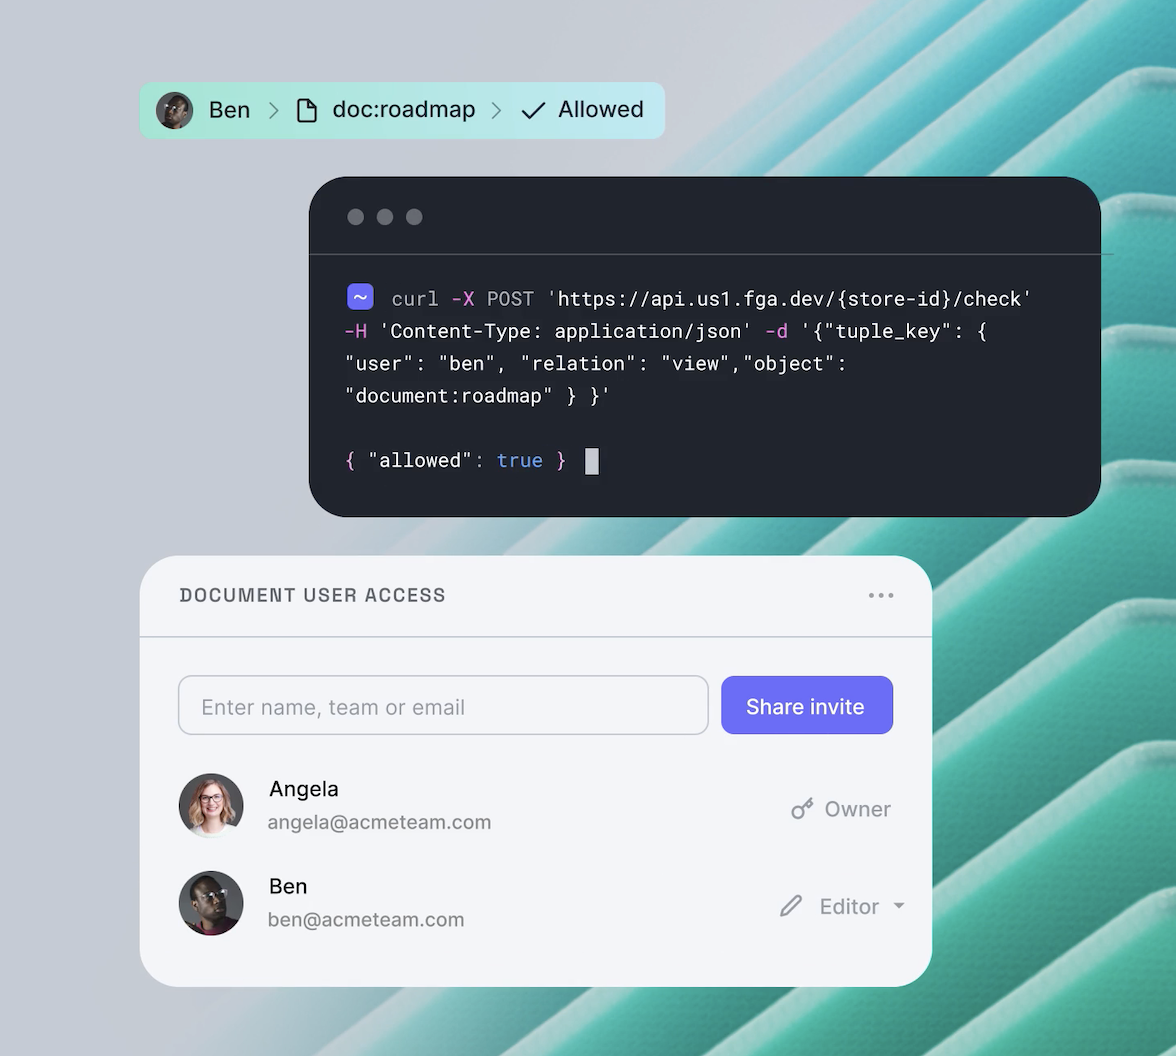
curl -i -X POST \
  -H "Authorization:Bearer $TOM_ACCESS_TOKEN" \
  -H "Content-Type: application/json" \
  -d '{"documentId": 4, "relation": "writer", "userId": "<user-id>"}' \
  http://localhost:8080/permission
Repeat the GET call to the document API and verify the view operation is authorized for the document, as it is implicit in the writer relation:
curl -i -H "Authorization:Bearer $ANA_ACCESS_TOKEN" http://localhost:8080/document/4Using Okta FGA
Okta FGA is a managed solution by Okta that uses the OpenFGA modeling language (DSL) and decision engine, and provides a set of APIs that let you check for permissions or add more data to the decision engine whenever data changes in your application so the decisions can stay up to date.
You can use the same credentials of your Auth0 account to log in to the Okta FGA dashboard at https://dashboard.fga.dev. If you don't have an Auth0 account, hop over to https://dashboard.fga.dev and create a free account. Navigate to the Model Explorer page in the dashboard, add the contents of auth-model.fga from the previous sections, and click Save.

Note: Check out the Okta FGA Playground to play around with the model editor or see some example models for applications like Google Drive, GitHub, or Slack.
On the left menu, find the Settings option and copy the Store ID and Model ID. In the Authorized Clients section, click on Create Client. Set the following values:
- Client Name: spring-api-fga
- Read/Write model, changes, assertions: Yes
- Write and delete tuples: Yes
- Read and query: Yes
Click on Create, copy the Client ID and Client Secret, and click Continue. Then update the application.yml with the following properties:
openfga:
  api-url: https://api.us1.fga.dev # check options for your region
  store-id: <okta-fga-store-id>
  authorization-model-id: <okta-fga-authorization-model-id>
  initialize: false
  credentials:
    method: CLIENT_CREDENTIALS # constant
    config:
      client-id: <client-id>
      client-secret: <client-secret>
      api-token-issuer: auth.fga.dev
      api-audience: https://api.us1.fga.dev/

spring:
  docker:
    compose:
      lifecycle-management: none
Stop the application and run it again; the API should work as before.
Learn more about OpenFGA and Spring Boot
In this post, you learned about OpenFGA integration to a Spring Boot API using the OpenFGA Spring Boot Starter 0.0.1, which was just released. I hope you found this introduction useful and can grasp the basics of fine-grained authorization through the OpenFGA system, as well as the benefits of moving authorization logic outside the application code. You can find the code shown in this tutorial on GitHub. If you'd rather skip the step-by-step and prefer running a sample application, follow the README instructions in the same repository.
Also, if you liked this post, you might enjoy these related posts:
- Deploy Secure Spring Boot Microservices on Amazon EKS Using Terraform and Kubernetes
- Get started with Spring Boot and Auth0
- Build a Beautiful CRUD App with Spring Boot and Angular
- Get Started with Jetty, Java, and OAuth
Check out the Spring Boot resources in our Developer Center:
- Authorization in Spring Boot
- Authentication in Spring Boot
- Role Based Access Control in Spring Boot
- Build and Secure Spring Boot Microservices
- Spring MVC Code Sample: Basic Authentication
Please follow us on Twitter @oktadev and subscribe to our YouTube channel for more Spring Boot and microservices knowledge.
You can also sign up for our developer newsletter to stay updated on everything Identity and Security.


