Like it or not, Generative Artificial Intelligence (GenAI) has massively changed the software landscape. Retrieval-Augmented Generation (RAG) is a cornerstone of GenAI-powered applications. It is an architecture that improves the accuracy of Large Language Models (LLMs) by providing more context to the model. This is done by retrieving updated or domain-specific data from a database or a search engine. This is a powerful technique that can be used to improve the accuracy of LLMs in a variety of applications.
Security is even more paramount when it comes to RAG-based systems, as we don't want the LLM to accidentally access or expose sensitive data. Traditional Role-Based Access Control (RBAC) systems are not enough to secure RAG applications. This is where Fine-Grained Authorization (FGA) comes to the rescue.
If you would like to learn the basics of using FGA for RAG, check out this blog post on RAG and Access Control: Where Do You Start?
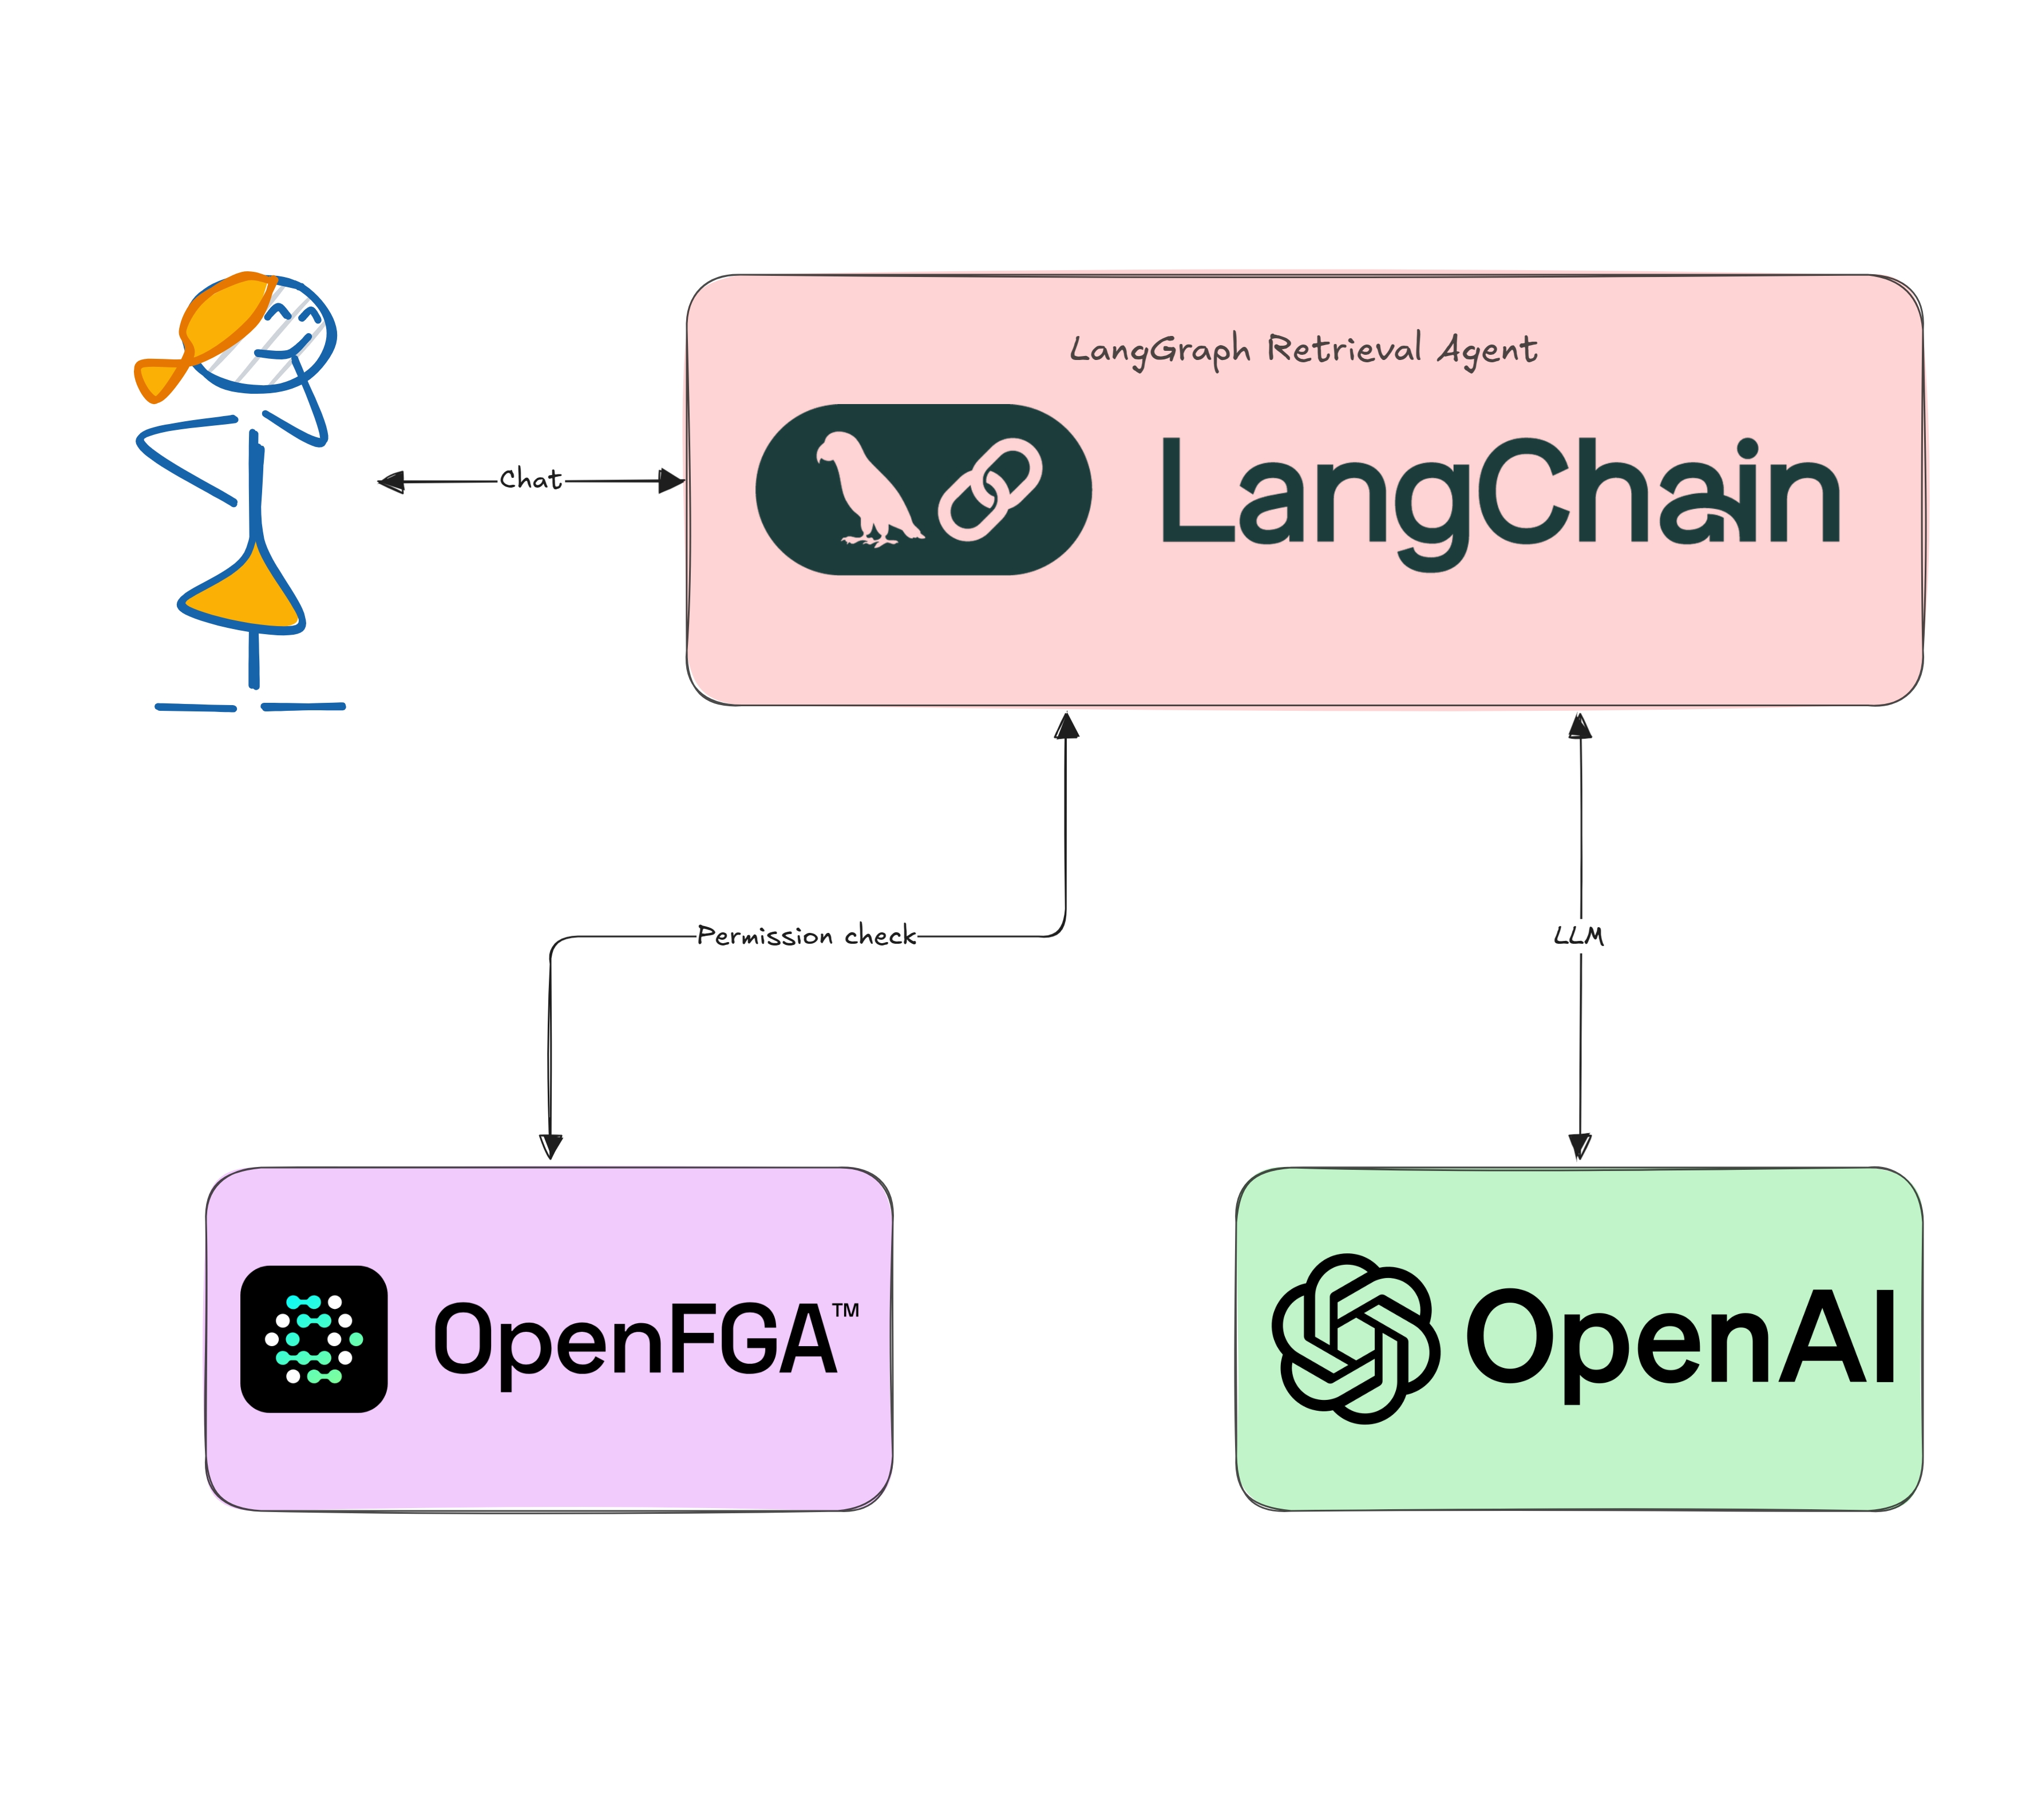
In this tutorial, we will build a simple RAG agent using the LangChain framework and secure it using Okta FGA.
Prerequisites
This tutorial was created with the following tools and services:
- NodeJS v20
- An Okta FGA account. Create one.
- An OpenAI account and API key. Create one.
Why LangChain?
LangChain is one of the leading frameworks for building context-aware reasoning applications, including RAG applications. It is open-source and provides a simple API to interact with the underlying LLMs. It supports a variety of LLMs, including OpenAI's GPT models, Google VertexAI, Anthropic, and more. It also provides a simple way to retrieve data from a database or a search engine to provide more context to the LLM. For this tutorial, we will use LangGraph from LangChain to build an agentic RAG application. LangGraph is a powerful tool that allows you to build agents that can handle complex tasks, including RAG applications. It provides advanced features like workflows, persisted context, and streaming support.
Set up a LangGraph RAG application
To get started, clone the auth0-ai-samples repository from GitHub:
git clone https://github.com/oktadev/auth0-ai-samples.git
cd auth0-ai-samples/authorization-for-rag/langgraph-agentic-js
# install dependencies
npm install
The application is written in TypeScript for the Node.js platform and is structured as follows:
index.ts: The main entry point of the application that defines the RAG pipeline.assets/docs/*.md: Sample markdown documents that will be used as context for the LLM. We have public and private documents for demonstration purposes.helpers/read-documents.ts: Utility to load markdown files as documents.helpers/langchain.ts: Defines the LangGraph retrieval agent.scripts/fga-init.ts: Utility to initialize the Okta FGA authorization model.
Let us look at the important bits and pieces before we run the application.
RAG pipeline
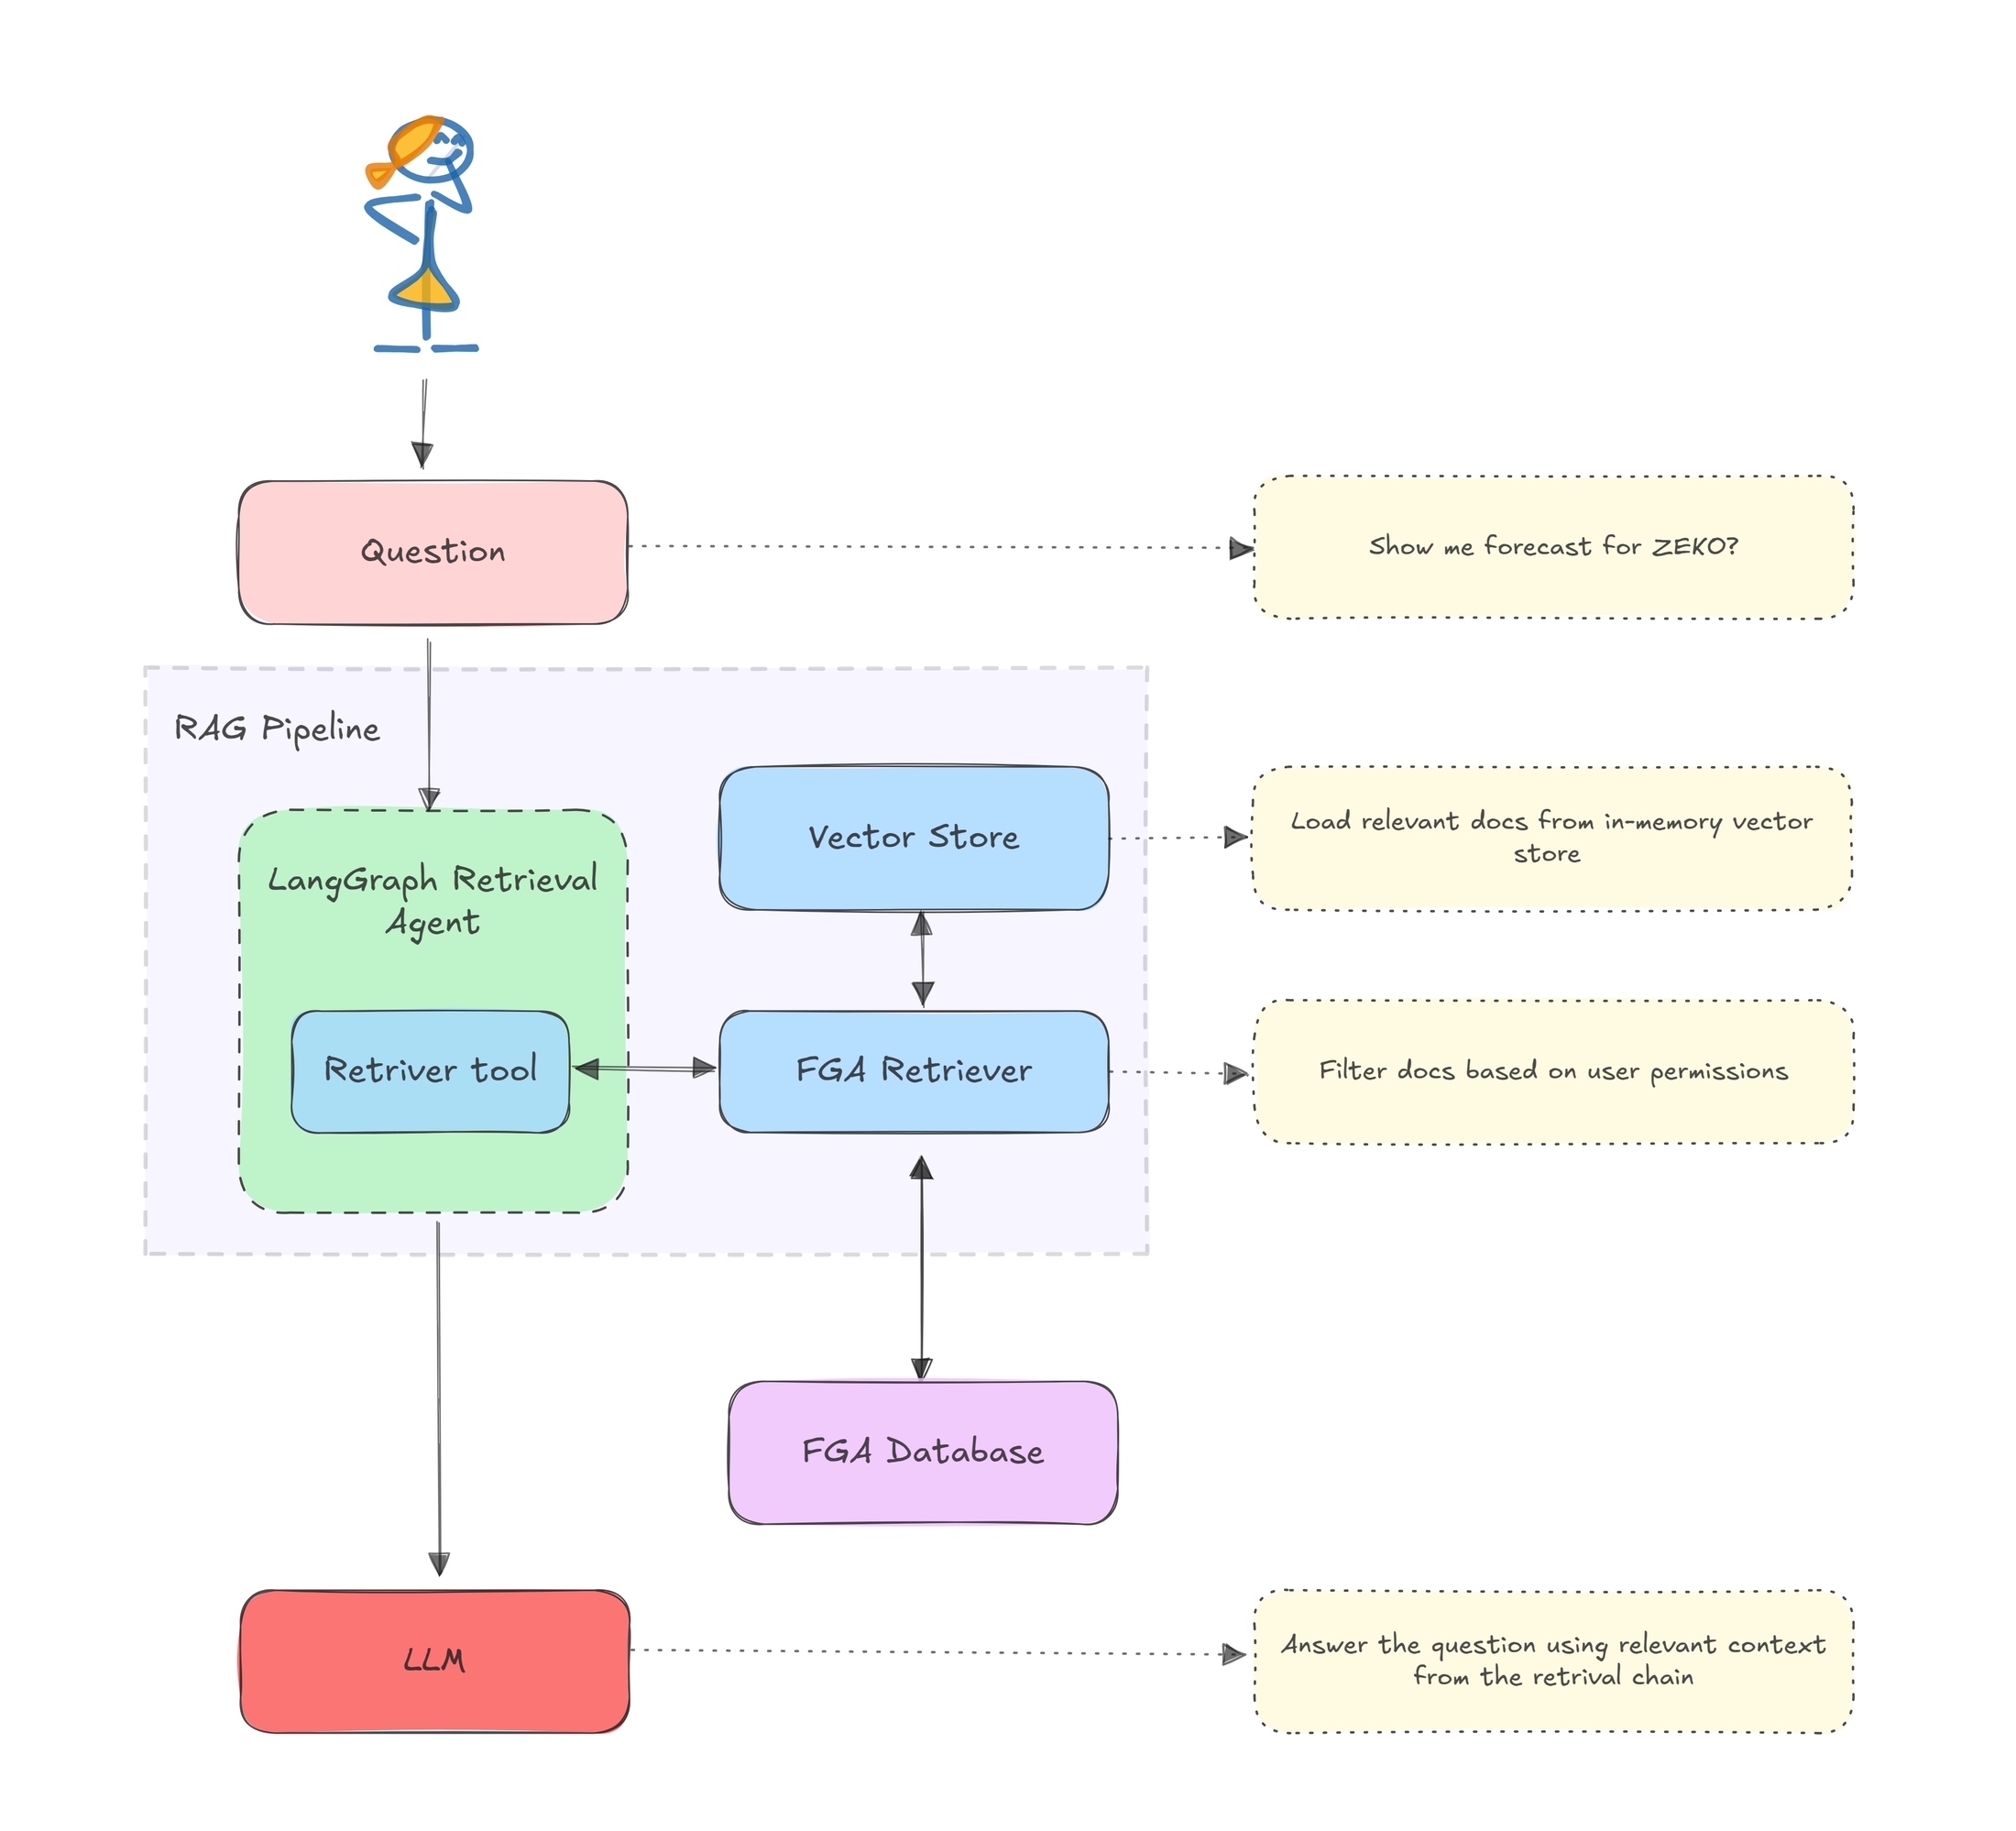
The RAG pipeline is defined in index.ts. It uses the LangGraph framework to interact with the underlying LLM and retrieve data from the database. The pipeline is defined as follows:
/** index.ts **/
const user = 'user1';
// 1. Read and load documents from the assets folder
const documents = await readDocuments();
// 2. Create an in-memory vector store from the documents for OpenAI models.
const vectorStore = await MemoryVectorStore.fromDocuments(
  documents,
  new OpenAIEmbeddings({ model: 'text-embedding-3-small' }),
);
// 3. Create a retriever that uses FGA to gate fetching documents on permissions.
const retriever = FGARetriever.create({
  retriever: vectorStore.asRetriever(),
  // FGA tuple to query for the user's permissions
  buildQuery: (doc) => ({
    user: `user:${user}`,
    object: `doc:${doc.metadata.id}`,
    relation: 'viewer',
  }),
});
// 4. Convert the retriever into a tool for an agent.
const fgaTool = retriever.asJoinedStringTool();
// 5. The agent will call the tool, rephrasing the original question and
// populating the "query" argument, until it can answer the user's question.
const retrievalAgent = RetrievalAgent.create([fgaTool]);
// 6. Query the retrieval agent with a prompt
const answer = await retrievalAgent.query('Show me forecast for ZEKO?');
Here is a visual representation of the RAG architecture:

FGA retriever
The FGARetriever class filters documents based on the authorization model defined in Okta FGA and will be available as part of the auth0-ai-js SDK. The alpha version of the retriever can be installed using the following command:
npm install "https://github.com/auth0-lab/auth0-ai-js.git#alpha-1" --saveThe build query function is used to construct the query to the FGA store. The query is constructed using the user, object, and relation. The user is the user ID, the object is the document ID, and the relation is the permission that the user has on the document.
buildQuery: (doc) => ({
  user: `user:${user}`,
  object: `doc:${doc.metadata.id}`,
  relation: 'viewer',
}),
Retrieval Agent
The RetrievalAgent class configures a LangGraph retrieval agent that uses the FGA retriever tool and an OpenAI model to answer the user's question. The agent will call the tool to get context documents in this case.
/** helpers/langchain.ts **/
static create(tools: StructuredToolInterface[]) {
  // Create a retrieval agent that has access to the retrieval tool.
  const retrievalAgent = createReactAgent({
    llm: new ChatOpenAI({ temperature: 0, model: 'gpt-4o-mini' }),
    tools,
    stateModifier: [
      "Answer the user's question only based on context retrieved from provided tools.",
      'Only use the information provided by the tools.',
      'If you need more information, ask for it.',
    ].join(' '),
  });
  return new RetrievalAgent(retrievalAgent);
}
Set up an FGA store
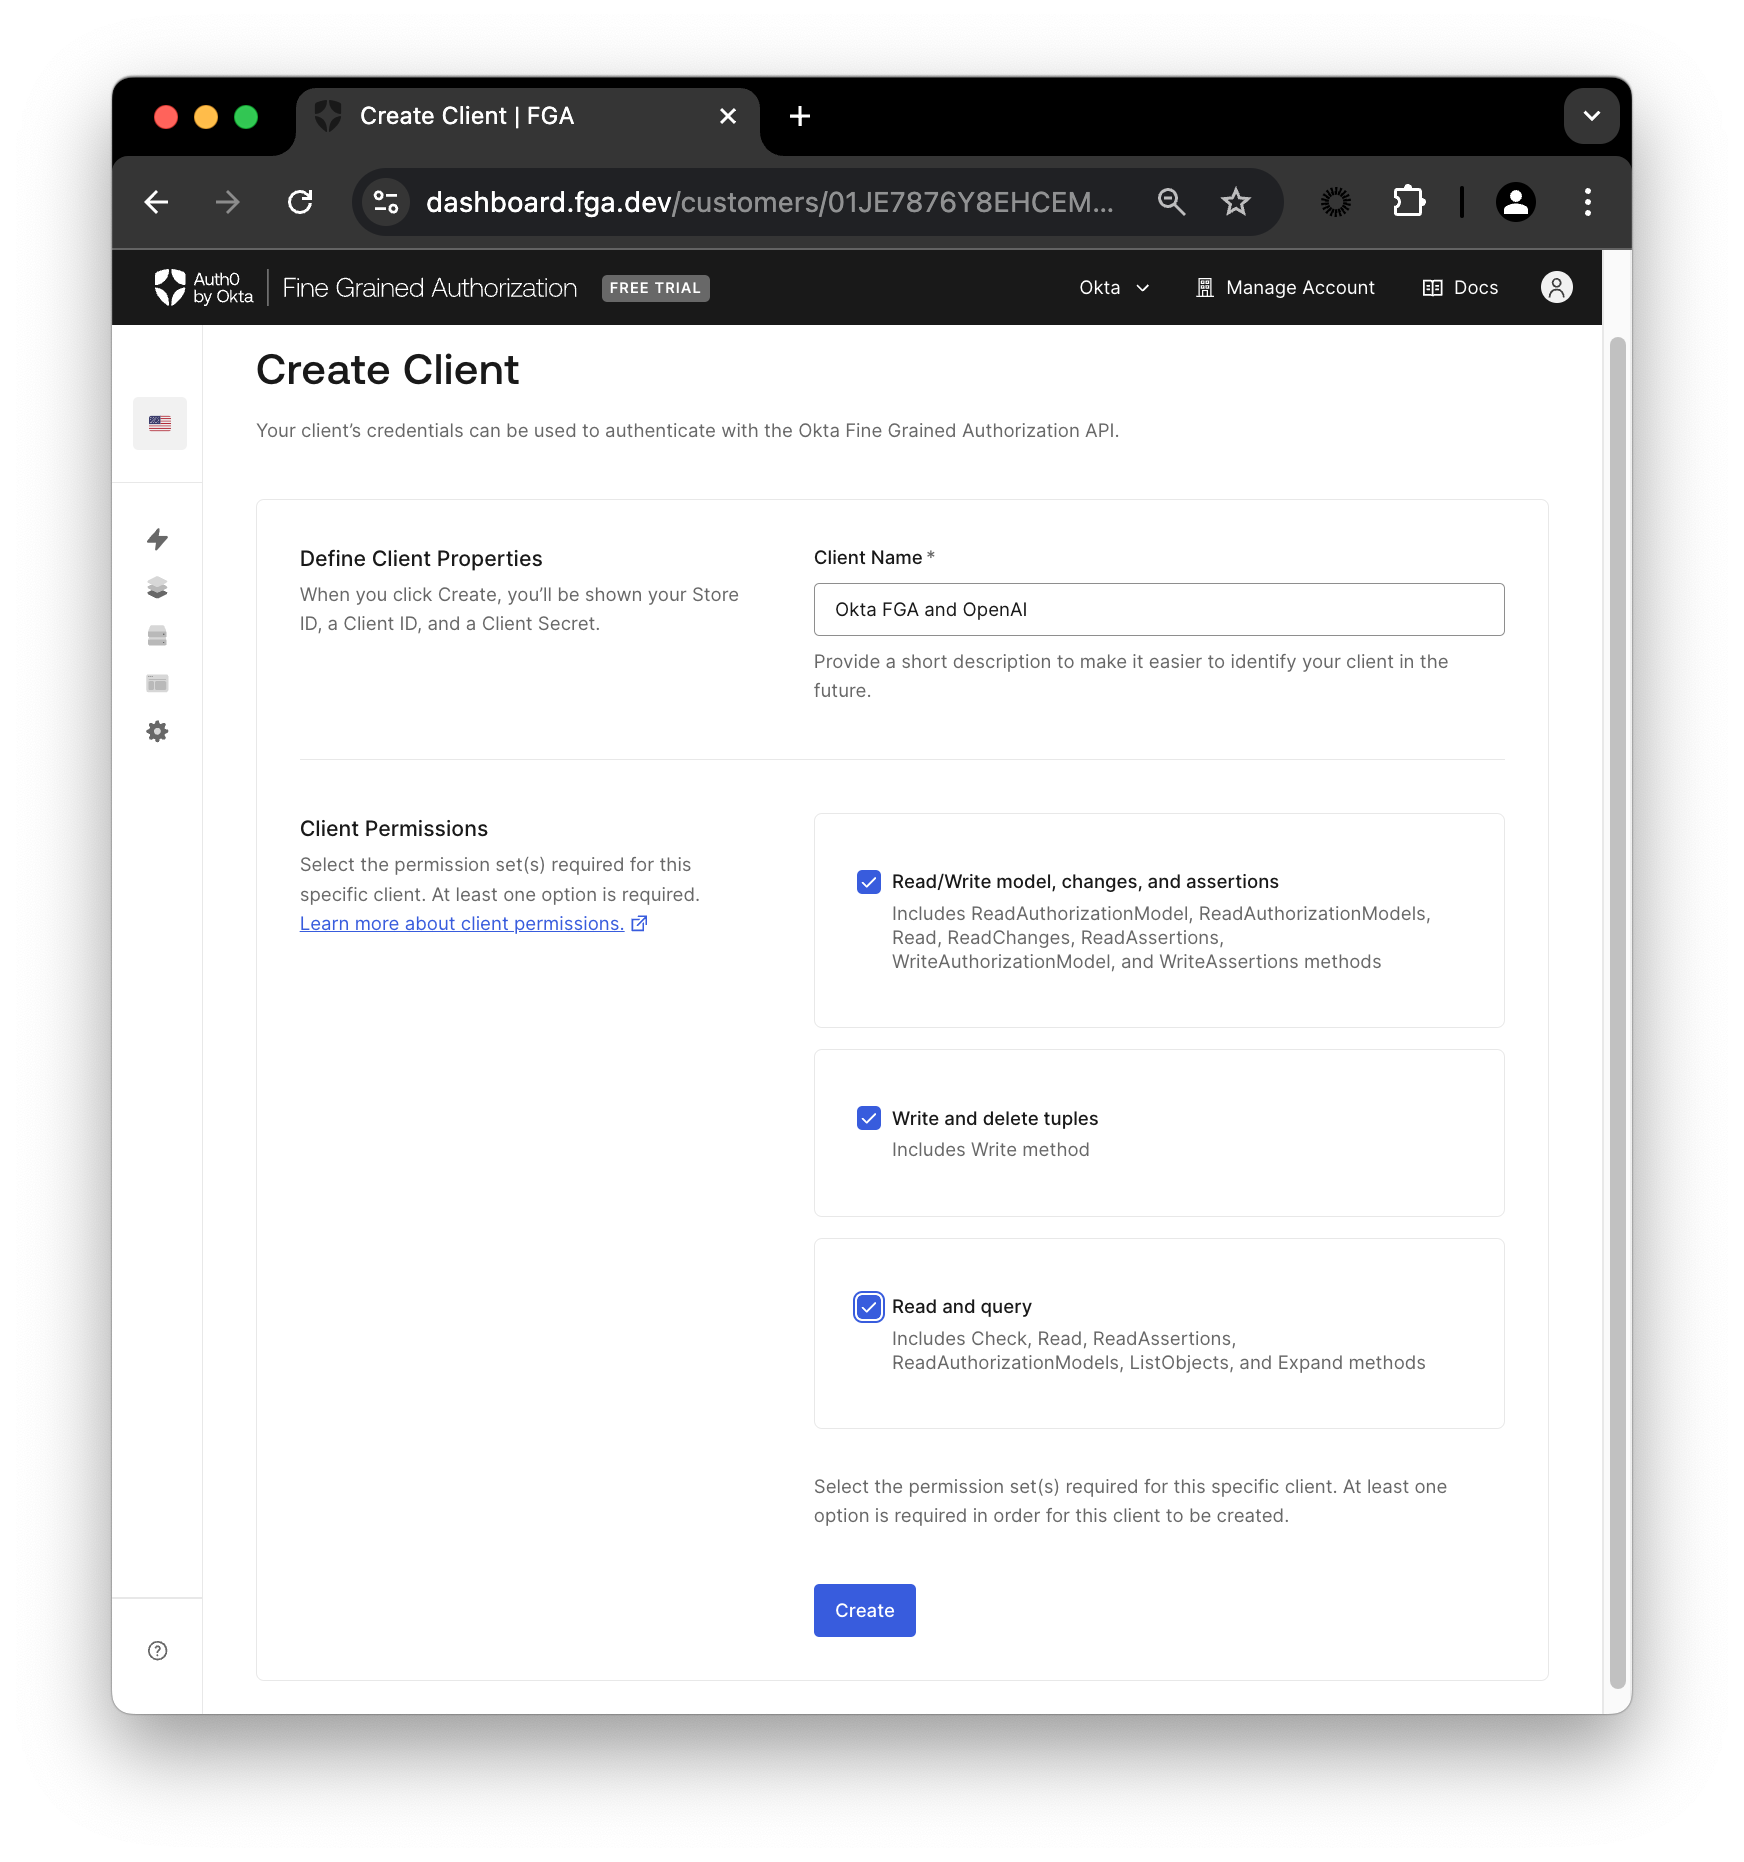
In the Okta FGA dashboard, navigate to Settings, and in the Authorized Clients section, click + Create Client. Give your client a name, mark all three client permissions, and then click Create.
Once your client is created, you’ll see a modal containing Store ID, Client ID, and Client Secret.
Add .env file with the following content to the root of the project. Click Continue to see the FGA_API_URL and FGA_API_AUDIENCE.
# OpenAI
OPENAI_API_KEY=<your-openai-api-key>

# Okta FGA
FGA_STORE_ID=<your-fga-store-id>
FGA_CLIENT_ID=<your-fga-store-client-id>
FGA_CLIENT_SECRET=<your-fga-store-client-secret>
# Required only for non-US regions
FGA_API_URL=https://api.xxx.fga.dev
FGA_API_AUDIENCE=https://api.xxx.fga.dev/
Check the instructions here to find your OpenAI API key.
Next, navigate to Model Explorer. You’ll need to update the model information with this:
model
  schema 1.1

type user

type doc
  relations
    define owner: [user]
    define viewer: [user, user:*]
Remember to click Save.
Check out this documentation to learn more about creating an authorization model in FGA.
Now, to have access to the public information, you’ll need to add a tuple on FGA. Navigate to the Tuple Management section and click + Add Tuple, fill in the following information:
- User:
user:* - Object: select doc and add
public-docin the ID field - Relation:
viewer
A tuple signifies a user’s relation to a given object. For example, the above tuple implies that all users can view the public-doc object.
Alternatively, you can use the
scripts/fga-init.tsscript to initialize the FGA store with the model and tuple. Run thenpm run fga:initcommand after setting up the.envfile.
Test the application
Now that you have set up the application and the FGA store, you can run the application using the following command:
npm startThe application will start with the query, Show me forecast for ZEKO? Since this information is in a private document, and we haven't defined a tuple with access to this document, the application will not be able to retrieve it. The FGA retriever will filter out the private document from the vector store results and, hence, print a similar output.
The provided context does not include specific forecasts or projections for Zeko Advanced Systems Inc. ...If you change the query to something that is available in the public document, the application will be able to retrieve the information.
Now, to have access to the private information, you’ll need to update your tuple list. Go back to the Okta FGA dashboard in the Tuple Management section and click + Add Tuple, fill in the following information:
- User:
user:user1 - Object: select doc and add
private-docin the ID field - Relation:
viewer
Now click Add Tuple and then run the script again:
npm startThis time, you should see a response containing the forecast information since we added a tuple that defines the viewer relation for user1 to the private-doc object.
Congratulations! You have run a simple RAG application using LangChain and secured it using Okta FGA.
Learn more about Auth0 for GenAI, Okta FGA and GenAI
In this post, you learned how to secure a LangChain-based RAG application using Auth0's Auth for GenAI and Okta FGA. Okta FGA is built on top of OpenFGA, which is open-source. We invite you to check out the OpenFGA code on GitHub.
Before you go, we have some great news to share: we are working on more content and sample apps in collaboration with amazing GenAI frameworks like LlamaIndex, LangChain, CrewAI, Vercel AI SDK, and GenKit. Auth for GenAI is our upcoming product to help you protect your user's information in GenAI-powered applications. Make sure to join the Auth0 Lab Discord server to hear more and ask questions.


