


This article is a practical guide on how to utilize Auth0’s enhanced security features in building modern web applications and seamlessly integrate them with other serverless solutions like FaunaDB, and Netlify. The article focuses more on how to integrate Fauna and Netlify with Auth0 in building a secure online E-diary.
Reader Goals
At the end of this article, readers would be able to:
- Create and configure a simple application on Auth0.
- Setup a FaunaDB database and configure it to support Auth0 as a security provider.
- Build a simple web application that uses both Auth0 and FaunaDB to function seamlessly.
- Deploy the web platform using Netlify and Heroku.
Pre-requisites
- Fauna account: In order to follow this tutorial, it's advised to have created an account with Fauna. If you don't already have one you can create one here.
- Auth0 account: You'll also need to have an account with Auth0 as you may have already guessed; you can easily sign up for an account here as well.
- Netlify account: You'll need to create an account with Netlify in order to deploy the front-end to it. I recommend creating an account using one of the sign-up options provided (Github to be specific). You can sign-up for an account with Netlify here
- Heroku account: We need Heroku to help host our application's config variables that contain sensitive information that can't be kept on the front-end for security purposes. We will be deploying a simple server to serve the variables when we need them in our front-end application. You can create an account from here
- NodeJs: You'll need to have NodeJs installed on your computer to follow along, which will also come with a package manager called
npmthat will help us to install the required dependencies for this project. You can download NodeJs from here
Create and Configure auth0 Application
We'll start with the first reader goal, which is to create and configure an Auth0 application. The Auth0 application is ideally unique to a user application; in our case, this would be the secure diary we're going to be building later on. This step focuses on setting up an Auth0 app instance for it and specifying some necessary config options to help with the development process.
To begin, login to your Auth0 dashboard and navigate to the applications section and click the Create application button to create a new application.
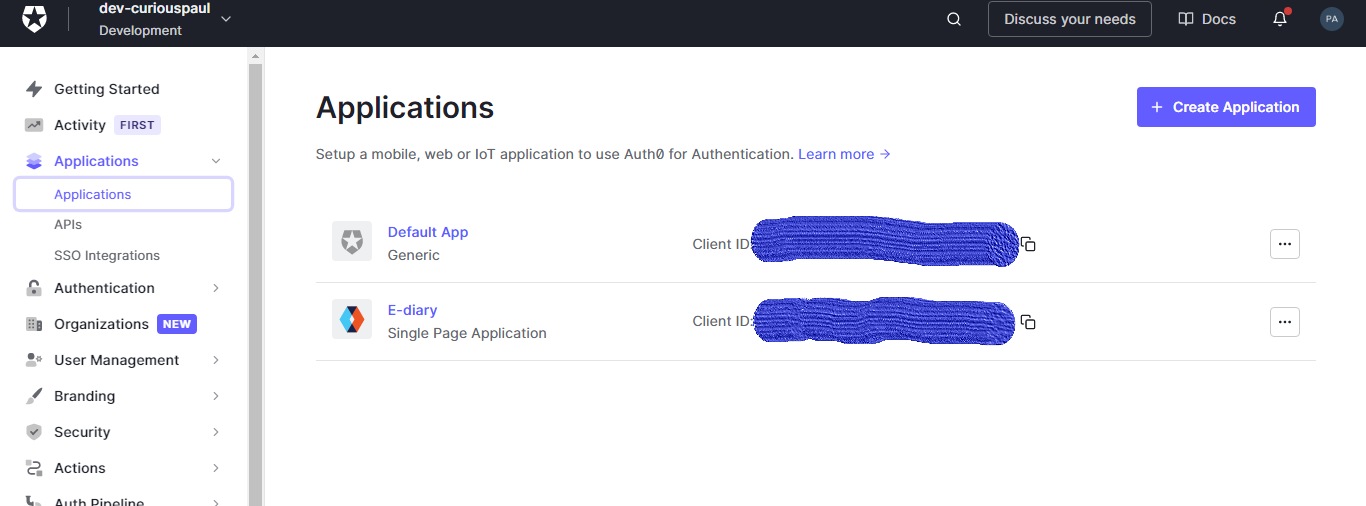
This brings up a prompt asking you to name your application and select what kind of application you want to create. Since we're building a frontend application that has no backend, we need to choose the Single page web application. Give the application a name and hit the submit button to create the application.

Configuring the auth0 Application
On the following prompt, head over to the settings tab - on there, take note of the details about your application and some default settings already made on your behalf. One such setting is the client ID, which is a unique identifier for the application, as well as the client secret. We'll be needing the client ID and the domain so copy those somewhere safe (ideally, this should be served from a backend server, as we will later see).
We will leave all other settings as they are for now and come back once we have the required details to add to those fields.
Adding roles
We also need to define user roles from Auth0. These roles tell us the amount of permission each user has on our application and define resources their access to protected resources on our application. For example, we could define user roles for a given application as follows:
admin: has access to all resources and the platform and admin-level privilegescommon-user: has access to "common" resources on the platform, as defined by his/her preference.premium-user: has access to "premium" resources on the platform, as defined by the premium plan, and has more access than acommonuser account.
It's clear that there are different levels of accessibility with this example platform, and you, for one, may have experienced this with any platform you've used in the past, or are currently using. This is called "role-based access-control", and is different from generic authorization that gives all users the same access to resources on the platform.
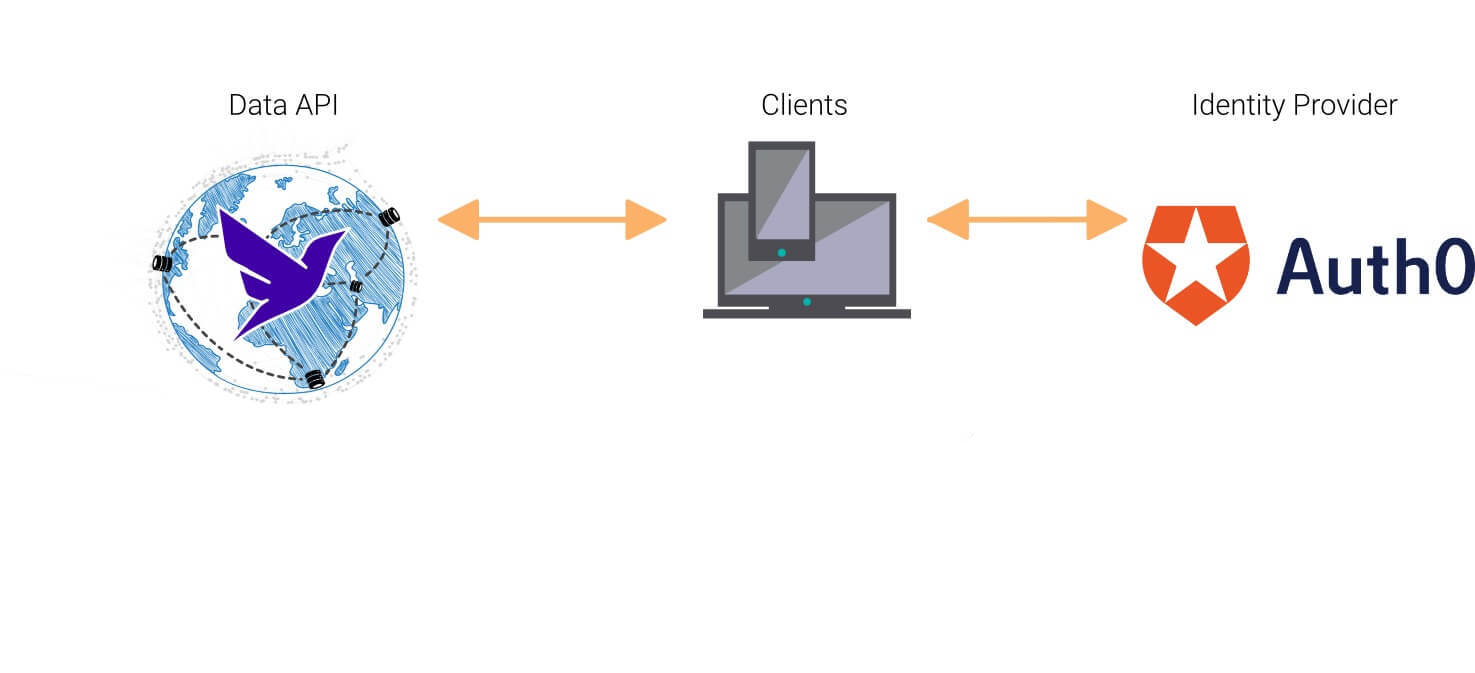
In order for us to communicate effectively with our FaunaDB database, we're required to properly define the "roles" our application will have from Auth0, and add this information to the access tokens generated by Auth0. This is important because we will be directly sending access tokens to our FaunaDB instance as opposed to a server. Fauna is able to register Auth0 as a token provider for our database and validate tokens from our Auth0 domain; that way, only requests with recognized access tokens will be accepted - combining Auth0 and Fauna this way is what puts the security on our application on a different level.
Fauna will look out for what "role" a newly logged-in user has in the token that it receives from Auth0, and use that to determine how much access should be given to the user. We will create two roles for our E-diary platform, namely:
adminuser
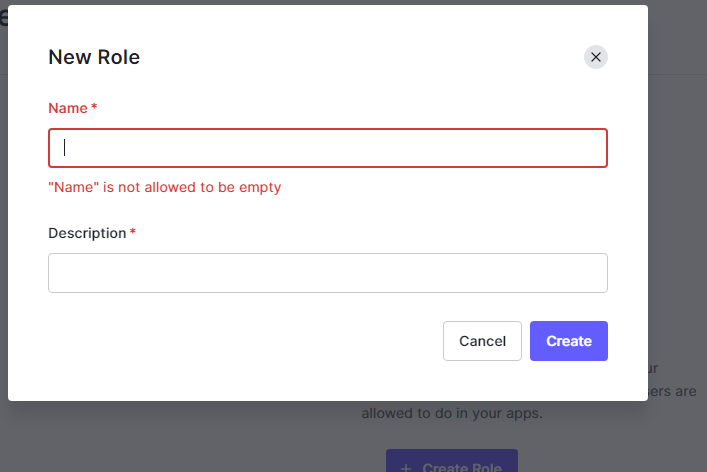
Head over to the User Management section from the dashboard, and choose Roles. On here, click on the Create Role button to add a new role, give this role a name, and add a description, then hit the "create" button to create the new role.
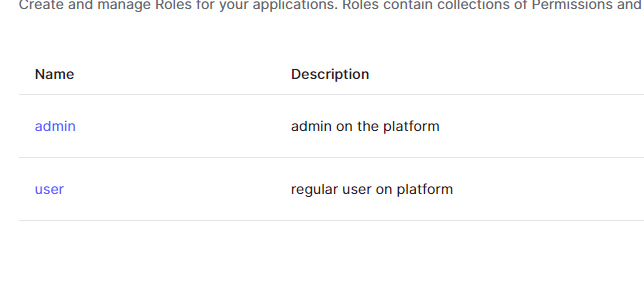
It should take you to a new page showing you some details of the role you just created, and options to add permissions for this newly created role. For this tutorial, we'll create two roles, one for the admin user and one for the regular users called user.
Next, we need to take the role that's assigned to a logged-in user to be made known to Fauna in the token that Auth0 sends to it. We can do this by using something called an Auth0 rule which is a piece of instruction (code usually written in javascript) that's executed anytime a user authenticates right before a token is created for the user.
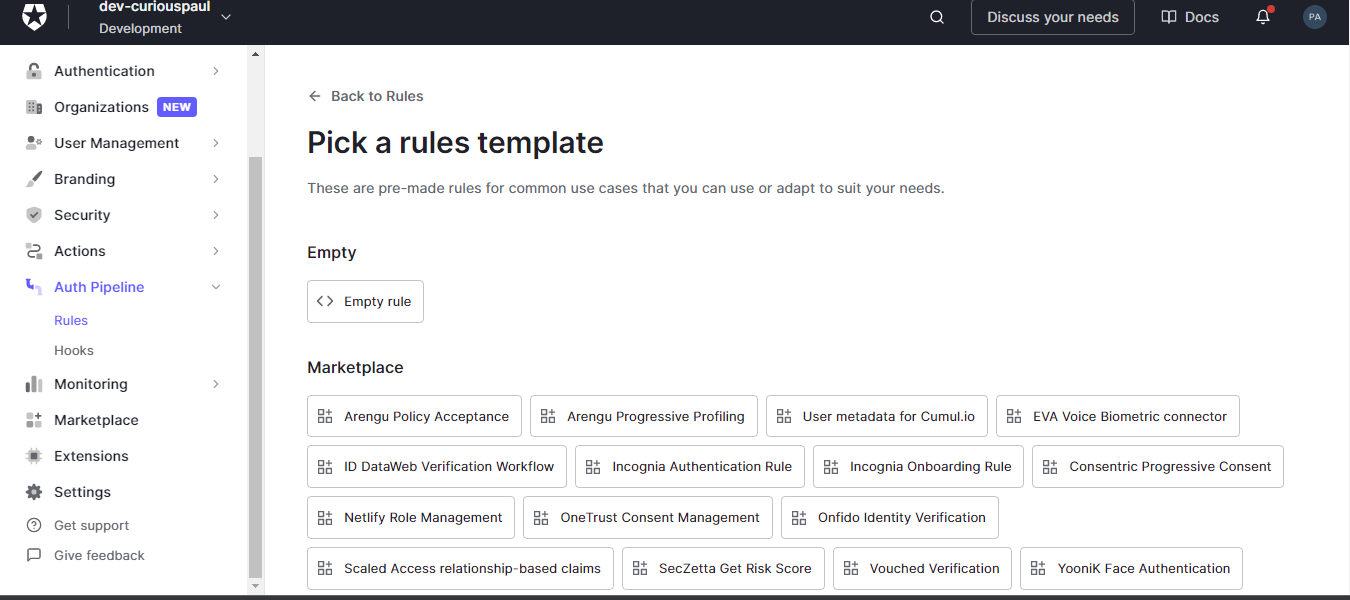
To create a rule head over to your dashboard and under the Auth pipeline section select the Rules option, there click the "create" button to add a new rule, you will be prompted to select a template.
Select the "empty rule" template, then fill the details in the prompt that follows, give it a name - I call mine "setUserRoles":
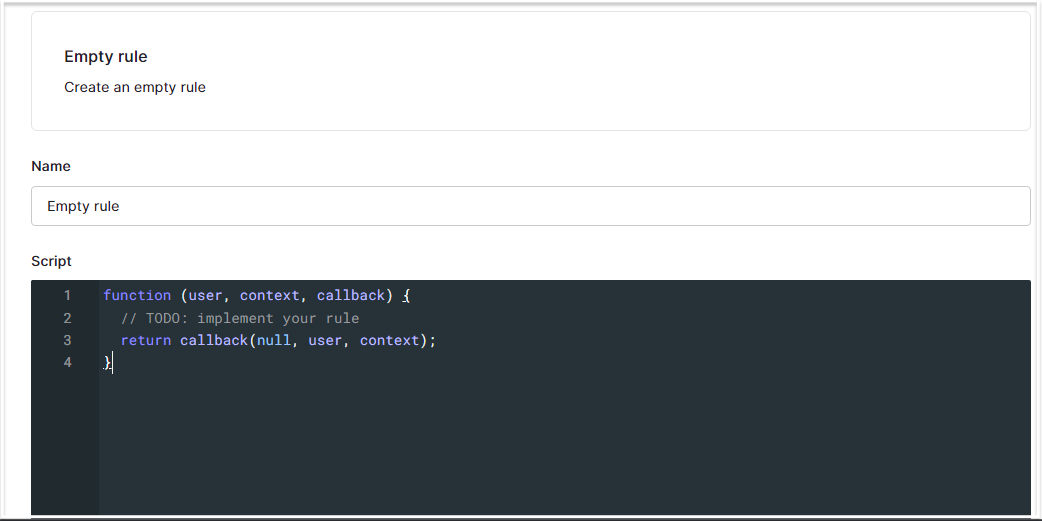
In the "script" section, replace the code in there with the following lines of code:
function setRolesToUser(user, context, callback) {
  context.accessToken['https:/db.fauna.com/roles'] = context.authorization.roles;
  return callback(null, user, context);
}
This rule will be executed on every authorization that takes place, and it will add the role that the current user has to the token that's created on behalf of the user. Here's a typical example of what this might look like in the token:
{
  "https:/db.fauna.com/roles": [
    "Admin"
  ],
  "iss": "https://Fauna-Auth0.auth0.com/",
  // ...
  // code omitted for brevity..
  // ...
}
Take note of the "Admin" role specified in the first few lines here, this is exactly what the rule we just created will be doing on our behalf each time a user logs in, it appends the role assigned to the user to the token payload, and in this case, this user has a role of type Admin.
Building the E-diary Platform
Building the interface
The first thing you want to do is to fork the repository for the demo project to your personal Github account and then clone it locally on your computer. You can access the repository for this article via this link. The project directory contains the markup files, styles and scripts for the front-end interface and is described as follows.
rootfolder
|   .gitignore
|___dist/
    |   index.html
    |___css/
    |     main.css
    |____images/
    |     add-outline.svg
    |     close-outline.svg
    |     search-outline.svg
    |___scripts/
    |     auth.js
    |     main.js
The dist folder contains an index.html file, along with scripts, and CSS stylings in the Css and scripts folders respectively. You can open the index.html file in your browser to see the content of the front-end if you wish. However, no functionality will be working just yet, since it's merely just an HTML file.
The page might also seem a bit bare, but that's because most of the content is added dynamically based on the state of our application with reference to authentication.
You will observe that I already added the CDNs for some of the libraries we will be using later on, particularly FaunaDB and Auth0 - in the index.html file. The CDN links tell the browser to load the libraries onto the web application, so we can use them without having to install them first using npm. Both Fauna and Auth0 provide the option to use CDNs to interact with their libraries. To find out more about CDNs, click here.
<head>
<!-- code omitted for brevity -->
<script src="//cdn.jsdelivr.net/npm/faunadb@latest/dist/faunadb.js"></script>
</head>
<body>

<!-- code omitted for brevity -->

<script src="https://cdn.auth0.com/js/Auth0-spa-js/1.13/Auth0-spa-js.production.js"></script>

</body>
Adding authentication functionality
For the front-end application to properly function, we need to set some configuration values, that the libraries we use require to validate our requests to Fauna, and Auth0. I have mentioned some of them earlier on - domain and client ID for example, are required to identify the application on Auth0, and the fauna_key option as shown below, is an API key provided by FaunaDB to validate requests being sent to a database.
For the purposes of configuring the application, we are going to be serving these config variables in a JSON file called auth_config.json, as shown below from a server that we will deploy to Heroku. Create a file called auth_config.json and keep this file anywhere you want for now.
{
  "domain": "YOUR_AUTH0_APP_DOMAIN",
  "clientId": "YOUR_AUTH0_CLIENT-ID",
  "aud": "YOUR_FAUNA_AUD_VALUE",
  "fauna_key": "YOUR_FAUNA_KEY"
}
You will need to add your own credentials to this object. You can get the domain and clientId from your Auth0 application settings on your dashboard.
The audience field holds a unique identifier for our database instance and should be contained in the "aud" parameter of the access-tokens from Auth0. You can get this "aud" value from the FaunaDB access-provider that we will create later on so just set its value to an empty string for now. The fauna_key field is also going to be discussed in later sections of the article, set this to an empty string for now also.
In the scripts directory, you will find a file called auth.js which is linked to the index.html file already as shown below:
  <!-- code omitted for brevity  -->
  <script src="/scripts/auth.js"></script>
  <!--
    .
    .
   -->
We can group most of the code in auth.js into functions, namely:
configureClient(): this function uses the credentials served from the server from the"/auth_config.json"endpoint to create an Auth0 client instance that can communicate with Auth0 for authentication requests.updateUI: this function, as the name implies, uses the Auth0 client instance to check the state of the current user on the platform for whether or not they're authenticated and updates the interface accordingly. This means that this function is responsible for what the user sees when a user is not logged in and when they're logged in. For example, it loads a "login" button when a user is not logged in and changes it to "logout" when they're currently logged in it's also responsible for displaying a user's diary notes. This function is called each time the window is loaded. Lastly, this function checks the token sent fromAuth0for which role the currently logged-in user has. If you recall, we wrote a rule onAuth0to help append the role of the user to the token each time they authenticate.login/logout(): this is a pair of functions that call some methods from the Auth0 client to either login or logout a user when the login/logout button is clicked.new_note(): this function is called when the submit button to add a new note to the user's diary is clicked on, it first checks if the user is authenticated and then creates a new FaunaDB client instance, which helps us to communicate with the FaunaDB API. This function uses theCurrentIdentity()method from FaunaDB to get the unique identifier of the user from the access-token it receives. This identifier looks like the one shown below:
“google-oauth2|107696438605329289272”We specify the owner of the new diary note using this unique id.
Note: the FaunaDB client is instantiated using the accessToken gotten from Auth0 as opposed to a FaunaDB API key, this is because we have specified Auth0 as the access provider to the database in the previous steps. This is the meat of this tutorial and this is what it makes possible. The domain is also specific to the region in which your database is located. Be sure to use the correct URI for your domain's region.
Lastly, observe the line of code that fetches the configuration from the server. It uses the fetch() function to send a GET request to a remote server that we will build and deploy in later sections of this article.
const fetchAuthConfig = () => fetch("<YOUR_HEROKU_URL>/auth_config.json");We will need to change the placeholder URL in that function to the correct one, once we have deployed.
Deploying to netlify
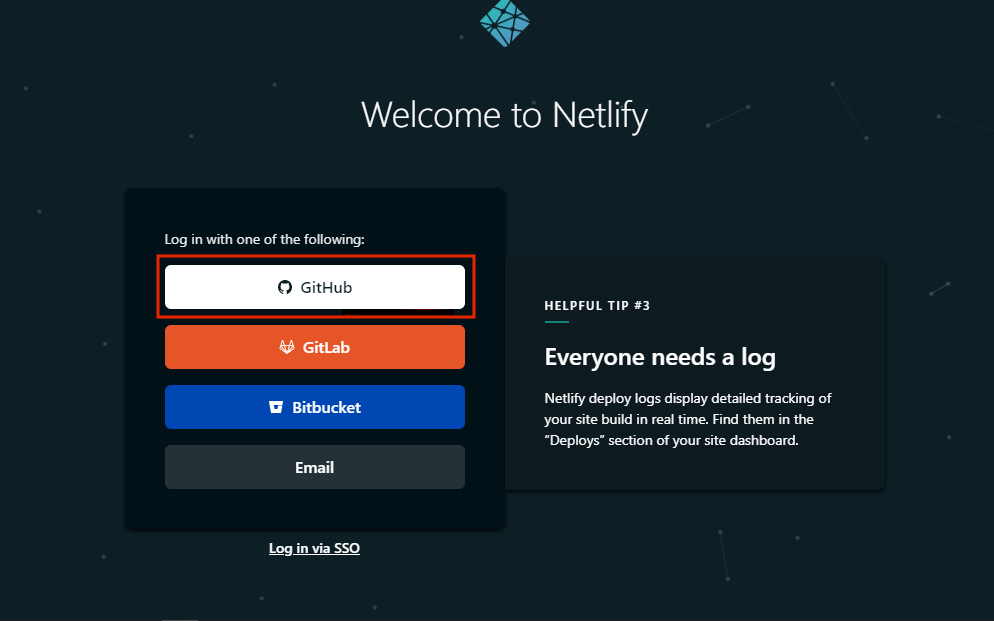
The first thing we need to do is to sign in to our Netlify account, using Github, as shown below:
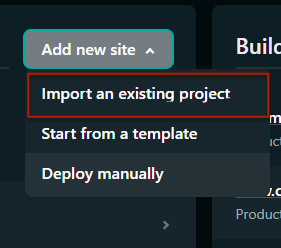
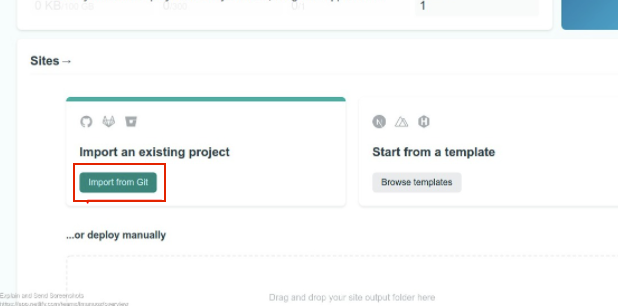
Once you're signed in, from your dashboard, you should see a Add new site button, with a drop-down of options. Choose the option to Import an existing project from the list of options shown.
If this is your first time using Netlify, you might not see the Add new site button; what you might see instead is an option to Import from Git as shown below:
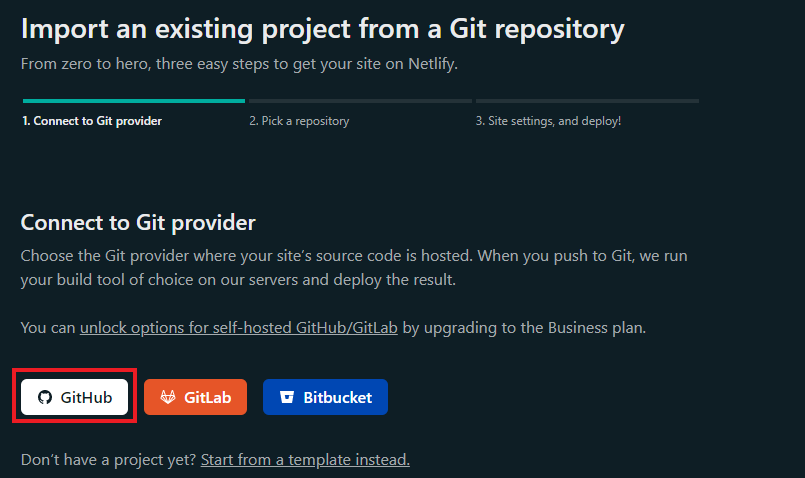
On the new page, you will be prompted to choose a Git provider, which corresponds to the platform where our code is hosted, in this case, it's hosted on github.com, so pick Github from the options provided.
Once you select the option, you should see it display a list of repositories on your Github account. Choose the repo that contains the code you want to deploy to Netlify, which in this case is called FaunaDB-Auth0-demo, so pick that and choose the branch to deploy from as main.

Set the Base directory, as well as the Publish directory options to dist. This refers to the dist/ folder in the repository that contains the HTML file as well as other static files like images, CSS stylings, and Javascript files. Netlify requires that you put all of your files in a dist folder before deploying, which is what I have done in the repository.
Once you're done with all these, click the Deploy Site button to deploy your application to Netlify. After the deployment is finished it should redirect you to your dashboard where it will now show you a link to your new deployment.

You can copy this link and paste it into a new tab to access the front-end of the application. However, the platform is yet to be functional, so clicking on the login button wouldn't have any effect.
Let us head back to our Auth0 dashboard, under the applications section, choose the Auth0 application we created earlier on.
Navigate to the Application URIs section here and add the Netlify deployment's URL we just copied from Netlify to the "Allowed Callback URLs", "Logout URLs", and "Allowed Web Origins" field(s). This will enable our local application to interact with the Auth0 API uninterruptedly.
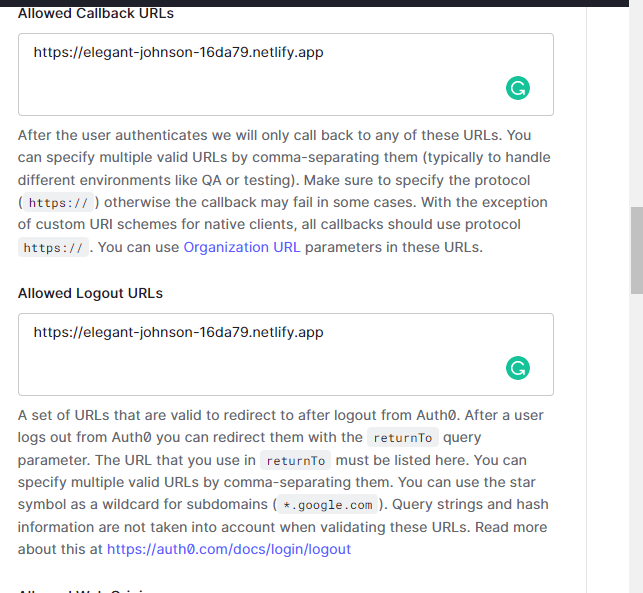
- Callback URL: the callback URL is the URL that a user is redirected to after successfully signing in. This, for example, might be a dashboard.
- Logout URL: this URL is specified as a redirect point after a user successfully logs out of the application.
- Allowed Web Origins: This option specifies
https://elegant-johnson-16da79.netlify.appwhich is my Netlify deployment's URL, as a trusted web origin to share resources with to the Auth0 app.
Finally, hit the Save button to persist in all of our changes.
Setting up the server
As I have mentioned earlier in the article, we are going to be serving the config values for our application from a remote server which we would be deploying to Heroku. This section addresses how to complete the server's setup and deploy it to Heroku.
The first thing we have to do is to checkout into the server branch from the terminal:
git checkout serverOnce you've checked into the server branch, you will find that the project folder structure changed, and it now contains a package.json file, server.js file, auth_config.json, and an access_provider.js file, as shown below:
rootfolder/
|   .gitignore
|   server.js
|   access_provider.js
|   package.json
|   auth_config.json
The first thing you want to do here is to install the dependencies defined in the package.json file. For the server, we need to install expressJs which is a web framework for Javascript, as well as CORS which helps us to send requests to the server from our front-end application without interruptions. You can find more information about CORS policies here.
I have specified the dependencies for this project in the package.json file in the dependencies field, as you can see below:
// code omitted for brevity
// ....
 "dependencies": {
    "axios": "^0.24.0",
    "cors": "^2.8.5",
    "express": "^4.17.1",
    "faunadb": "^4.4.1"
  }
// ...
The two other libraries that you see in the dependencies field are to be used by the access_provider.js script, and we will discuss that in detail further in this article.
All you have to do now is to run the following command to install them:
npm installNOTE: You need to have installed NodeJS before you try running this command, so if you haven't head back to the "pre-requisites section to see instructions on how to do that
The server.js file contains only one endpoint on /auth_config.json which exposes the config file as shown below:
// code omitted for brevity
// ...
// Endpoint to serve the configuration file
app.get("/auth_config.json", (req, res) => {
  res.sendFile("auth_config.json", {root: '.'});
});

// ...
This means the server looks for a file called auth_config.json and when it finds it, it sends it back to the client. This is all the server will be doing, and this helps to keep our config data secure to some extent and accessible only on request. Copy the contents of the auth_config.json file you created earlier on from wherever it is and paste its contents inside the auth_config.json file in this branch.
Deploying The Server To Heroku
We will now work on deploying this server to Heroku. The first you need to do is to is to install the Heroku CLI tool which you can find via this link. I am assuming you have created an account with Heroku as mentioned in the pre-requisites section earlier on.
Once the CLI is fully installed, you may need to close the terminal and open a new terminal before you are able to access the CLI. Navigate back to the project directory where you cloned the repository and run the following command to log into the Heroku CLI from the terminal.
heroku loginThis would prompt you to press and key on your keyboard to login from your browser, follow the prompt accordingly, and login from the browser.

Once you're logged in, run the following command to create a new Heroku application. Give this new application any name you like, for me, I chose the name - auth0-fauna. You won't be able to use this name anymore so pick a different name for your application.
heroku create <YOUR_APP_NAME>Here I use the "create" command to create a new Heroku application called "auth0-fauna", you can give yours any name you wish of course. Next, you want to link the current repository to Heroku, so that we can deploy the application from our git repository. Run the following command to add the current repository to Heroku:
heroku git:remote -a <YOUR_APP_NAME>This way we can directly push our code base to Heroku with a continuous development pattern. Meaning we can deploy to Heroku via git, as we are making changes to the project.
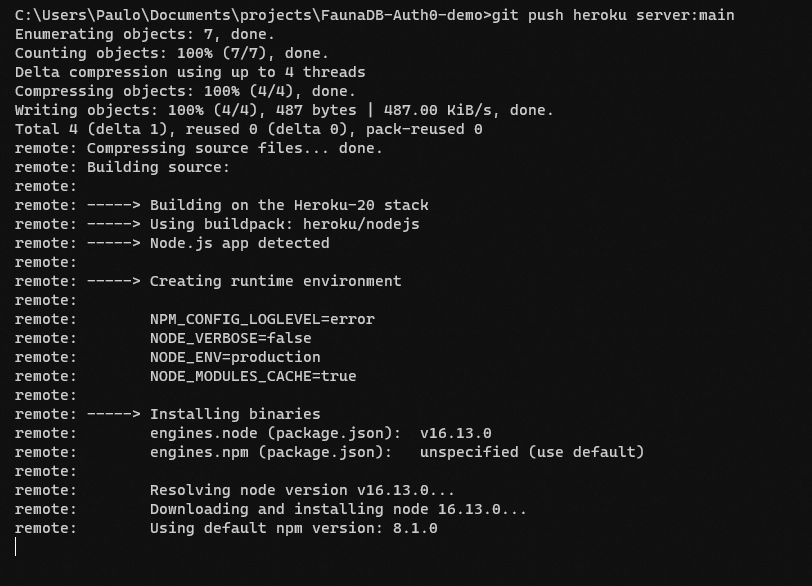
Once this is done, add and commit the changes in the repository and then push the code to Heroku as follows:
git add .git commit -m "updated config"git push heroku server:mainHere we add and commit the changes made to the config file and then, push the entire code to Heroku so that it can be deployed. If you did this correctly, then you should see the following deployment logs when you run the git push.. command.
Once this is done you should find a link at the end of the logs displayed that directs you to your deployed Heroku application, as shown below:

In my case, the application is up at the following link: https://auth0-fauna.herokuapp.com. The general rule of thumb is that the URL is of the format: https://<Your_heroku_app_name>.herokuapp.com. You can paste this link in your browser to test the server, and hit the /auth_config.json endpoint and the server should serve the JSON file to you, as shown below:
Let us now update the URL in the fetch function from the auth.js file from earlier, so head back to the auth.js file and change the URL to the URL of your newly deployed Heroku server, as described above.
You must first checkout to the main banch using the following command to access the auth.js file, since we're currently in the server branch.
git checkout mainOnce you're there edit the URL to point to your newly deployed Heroku application. In my case this would be:
const fetchAuthConfig = () => fetch("https://auth0-fauna.herokuapp.com/auth_config.json");The next thing we want to do is set up our database to host the user's notes and configure it for role-based access control.
Setting-up a Fauna Database to Support Auth0
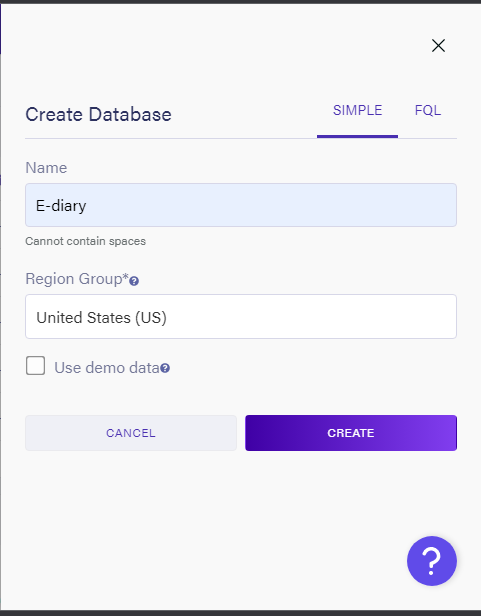
Let us now begin to set things up for our database. We'll start by creating a database on Fauna. So, log into your Fauna account and on the dashboard and click on the create database button to create a new database, give it a name and pick a region for the database.
The region you pick will determine the domain you would use to access the database instance from within your applications. For example, since my database region is in the United States region, my domain would be db.fauna.us.com, however, if yours is in the classic region, then your domain would be db.fauna.com.
Creating a collection
Next, we want to create a new collection called Notes which is where we'll store user notes or diaries. Use the New collection button on the next page to create a new collection.

Give it a name, and leave other settings as they are, and hit Save to create a new collection. Next, we want to add some config options to our database instance so that it's able to accept tokens from our Auth0 application.
Creating indexes and roles
The next thing to do is to add some additional resources that we want to have access control on, in this case, we want to add indexes that are available to only certain kinds of users with the right permission.
On the Indexes tab in your dashboard click the new index button to create a new index, as follows:
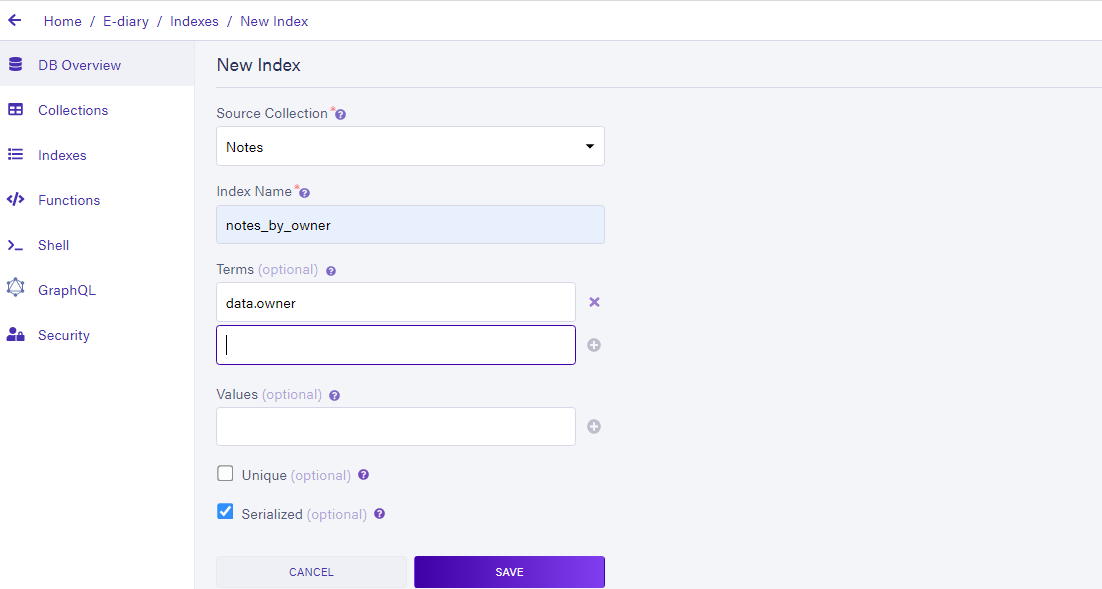
Here I set the terms option to be data.owner this is required as a constraint for the search done on the collection using the index. For more information about how indexes work, you can visit the FaunaDB documentation. Create a second index called allNotes leave the terms and values fields empty - this index would be used to fetch all notes on the platform. Lets us now create roles and define the permissions for each one.
Adding roles on Fauna
Click the New Role button under the Security/Roles section on the dashboard, to add a new role. This brings up a dialogue with a form, containing options or permissions for this role, here you can specify the privileges that you want to give this role on the database. Filling this form helps us to answer the question of what resource is accessible to the role and what is not.
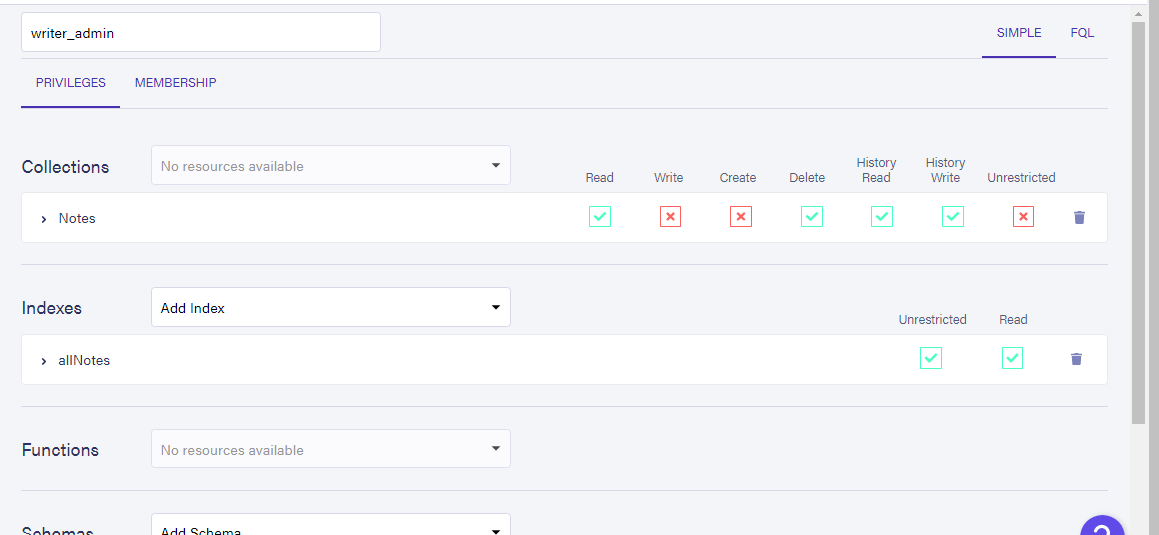
For example, for the writer role, we want the user to have full access to their diary; they can read, write, edit and even delete the notes from the Notes collection. We can name our new role (it doesn't have to be the same as with the Auth0 role name), and make those specifications by selecting the Notes collection from the dropdown and checking the privileges we wish to give as follows:
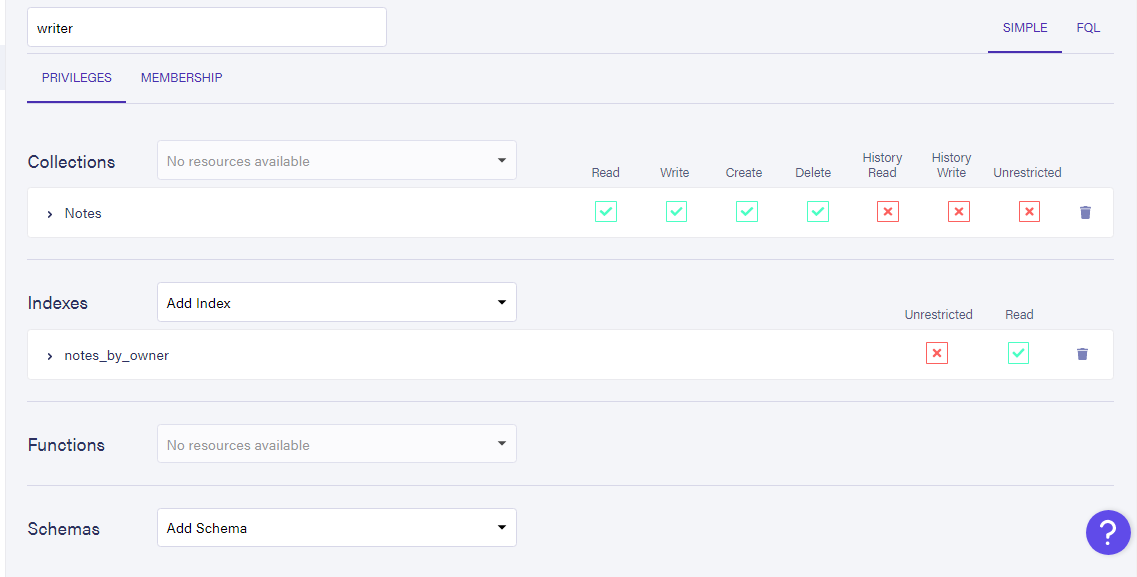
We could also specify other resources apart from collections; as you can observe from the form, roles can have access to functions, indexes, and schemas in the database instance; in this instance, this role also has access to the notes_by_owner index as well. Click Save to save this new role.
Create another role called writer_admin and give it the permission to "read" from the database using the allNotes index. This would be assigned to whoever has the role of admin
Fetching an API key
One last thing we need to do is to get an API key from FaunaDB, so that we can use it to interact with the Fauna API to help us create a new access_provider for Auth0. We will only use this api-key once in the next step, just to send a request to Fauna to create an access-provider.
Head over to the Security/KEYS section from your dashboard and click on the New Key button to generate a new api-key, as shown below:
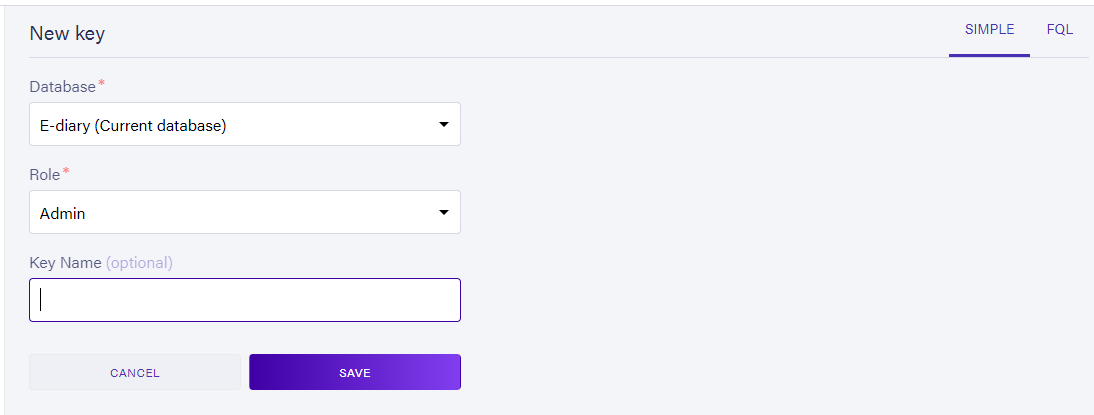
Leave the options as they are and click Save this would generate a new key in bold print that you can copy and save somewhere. Copy this string and add it to the auth_config.json file from earlier, with the key name of "fauna_key".
To do this, you must agan, checkout to the server branch one more time using the command:
git checkout serverOnce there, update the auth_config.json file to contain this new value as follows:
{
  // code omitted
  "fauna_key": "fnAEVyMVHJ89Hssyewugd7"
}
Save this, then commit the changes to git and then push to Heroku just like we did in the previous steps to deploy our server to Heroku. This is so that the Heroku application we deployed, would have the newest version of the config file.
Adding an access-provider
In order for us to be able to receive tokens from Auth0 and validate them, we must define Auth0 as an access-provider on Fauna.
In order to create an access-provider I have included a file called access_provider.js in the root-level of the project directory in the server branch of the repository, which is what you should still be on. This file contains the instructions on how to parse the roles embedded in the tokens that Auth0 sends and assign the corresponding permissions to them in Fauna, as you can see in this snippet:
// code omitted for brevity..
//  ..

const AssignRole = (faunaRole, auth0Role) => {
  return {
      role: q.Role(faunaRole),
      predicate: q.Query(q.Lambda('accessToken',
      q.ContainsValue(auth0Role, q.Select(["https:/db.fauna.com/roles"], q.Var('accessToken')))
      ))
  }
}

// ..

return await _client.query(
    q.CreateAccessProvider(
        {
            "name": "Auth0",
            "issuer": `https://${config.domain}/`,
            "jwks_uri": `https://${config.domain}/.well-known/jwks.json`,
            "membership": [
                AssignRole('writer', 'user'),
                AssignRole('writer_admin', 'admin')
            ]
        }
    )
)

// .. code omitted
The AssignRole function is a helper function that takes in two arguments that correspond to the name of the role on our Fauna database that we want the user that's logged in to have as well as the role from the token sent by Auth0.
This function checks the access-token for the role of the currently logged-in user and then assigns whatever role was passed as the "faunnaRole" argument to the user.
In the CreateAccessProvider class, you can see that I have set it such that a user with an Auth0 role of "user" would be set to have a role of "writer" on our Fauna database (and of course, each role comes with its own set of permissions). Likewise, the "admin" role gets assigned the role "writer_admin" on our Fauna database.
Lastly, observe the line in this file that sends a request to the server to fetch the config values, this should look like the line below:
// code omitted for brevity
const resp = await axios.get("<YOUR_HEROKU_URL>/auth_config.json");
// ...
// ..
You need to replace the placeholder text with the actual URL of your Heroku application.
We're going to run this file using nodejs from the terminal, so navigate to the project directory and then run the script using the following command:
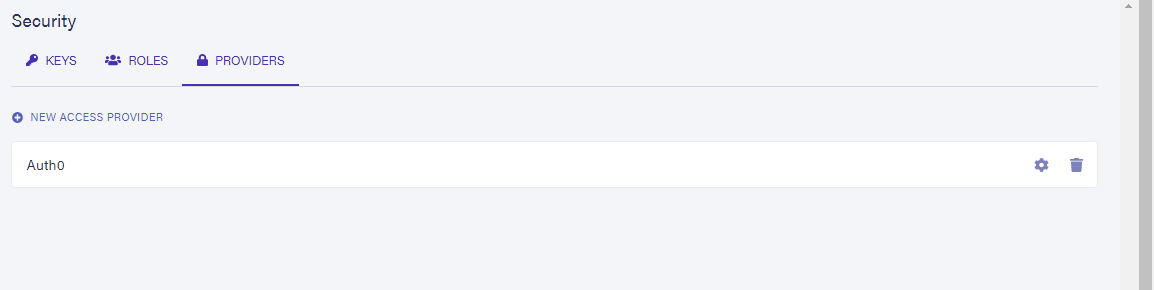
node access_provider.jsThis would create an access provider called Auth0 for our Fauna database, and you can see this if you head over to the Security section of your dashboard and under the Access Providers tab you should see your newly created access-provider as shown below:
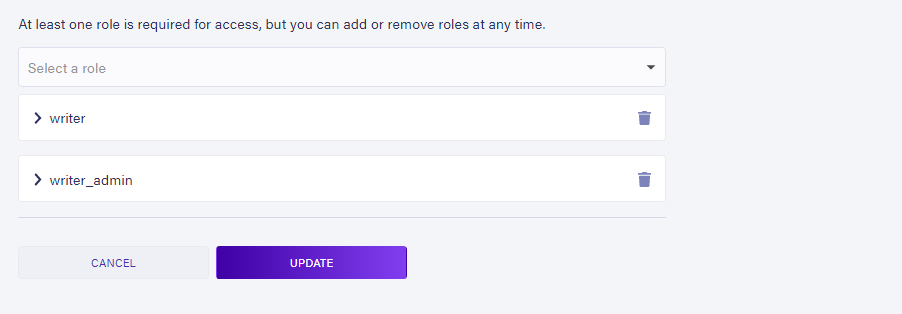
Another thing we must do is to specify the roles to be attached to the access-provider, so click the settings icon on the access-provider and on the role field select the two roles we created.
Finally, we must add the value for the aud config option in the auth_config.json file from earlier. We can get the audience value from our Fauna dashboard, so head over to the newly created access-provider under the Access Providers tab, you should see a settings icon by its side, click on it to expose the configuration options on it, as shown below:
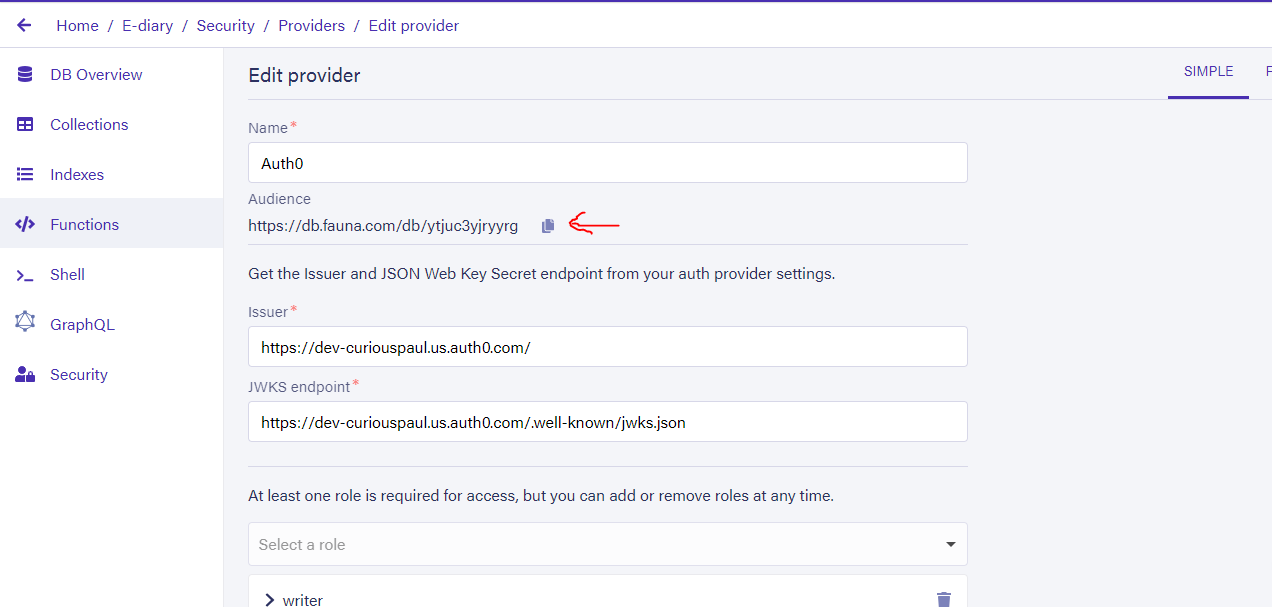
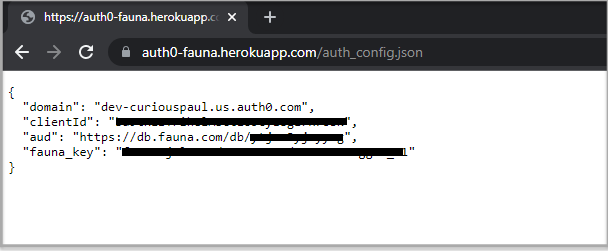
On there, you will find the "audience" field is automatically set and is not editable, so click on the copy icon to copy it, and then add it to your config file. Once you've added it to your config file, your config file should look like the following:
{
  "domain": "dev-curiouspaul.us.auth0.com",
  "clientId": "ba9****ct******",
  "aud": "https://db.fauna.com/db/ytj***g",
  "fauna_key": "fnAEacjT******du3wK66w****"
}
After adding this new value to the config file, commit the changes, and then push it to Heroku as we have done before.
Next, we must make sure that this aud value is contained in the tokens that Auth0 is sending.
To accomplish this, we'll take a quick detour back to Auth0 and create an API, which is where this "audience" will be served from. So head over to the "applications" section on your Auth0 dashboard and select the Apis option, from there click the button to create a new API and you should get a prompt like the one shown below:
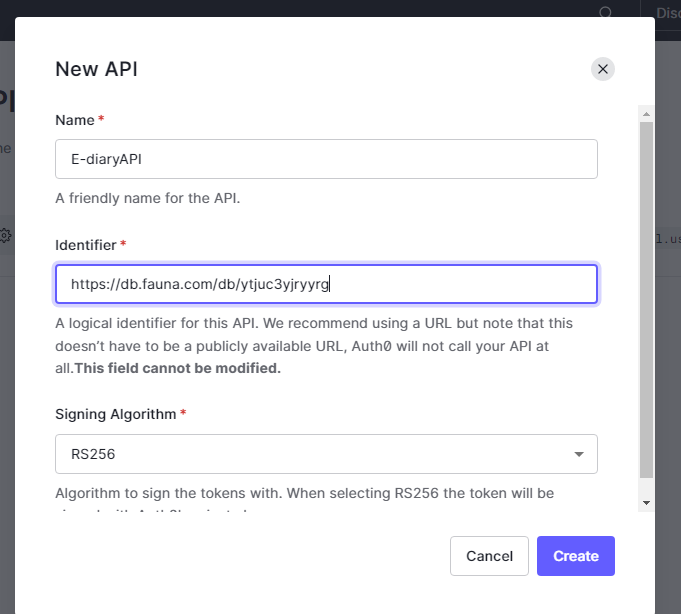
Give this a name and paste into the audience URL that we got from Fauna after creating a new access provider then hit the Create button to add a new API.
Testing the platform
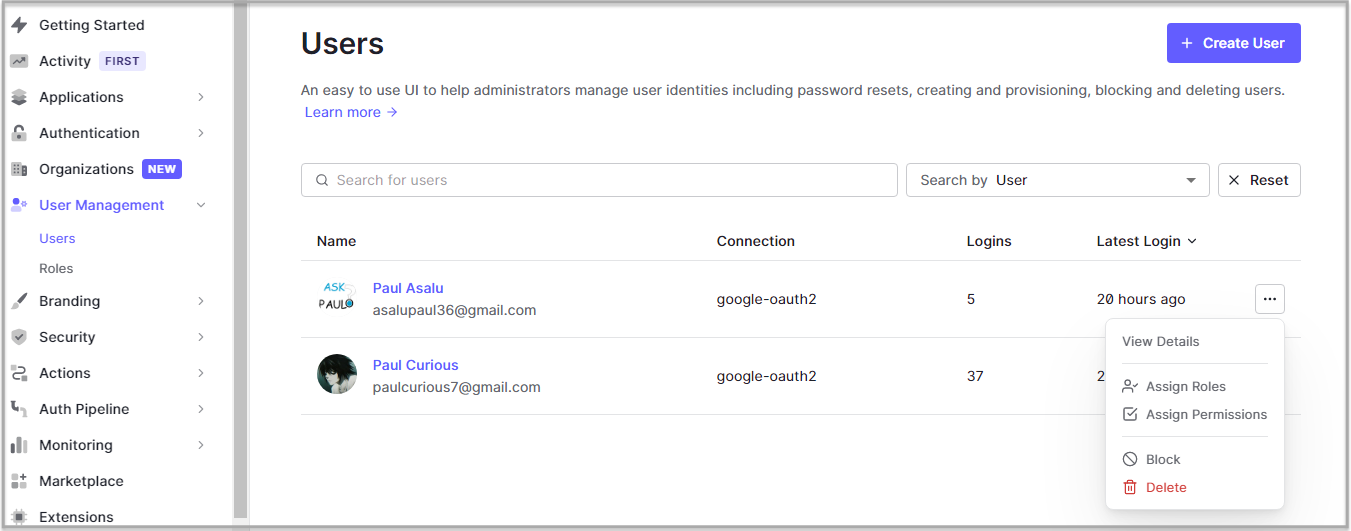
Now we can test the platform, let's start by creating two users, so start the server or restart it if it was already running, and head over to <YOUR_NETLIFY_URL> which in my case is https://dreamy-bartik-8a7d68.netlify.app. Click on the login button and sign in using a google account, to create a new user account on Auth0, log out and then sign in again but this time with another google account, to create a second user account on Auth0.
We will assign each one of these two accounts a role from our Auth0 dashboard, if you recall we also created two roles on Auth0, earlier on - admin and user on our dashboard. So head over to your Auth0 dashboard, under the user management section, and then choose the users option. On there, you should find the two users we've added from there. From there, click on the additional options icon and then choose the option Assign Roles from the list of options showed pick one role for each user. Assign one to a role of admin and the other to user.
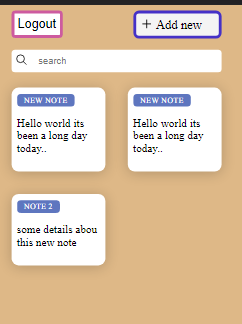
Now we can head back to the platform on <YOUR_NETLIFY_URL>, and then log in to the platform using the email that you have assigned the user role on Auth0, and you should see the interface change accordingly with some option to add a new note.
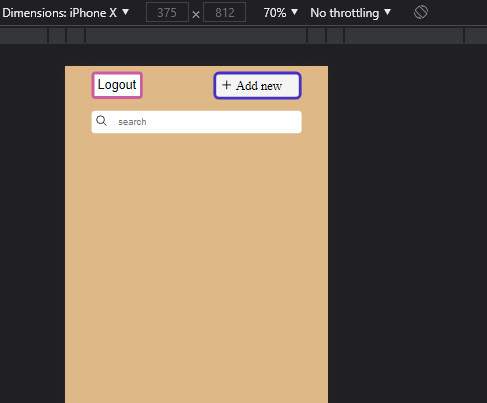
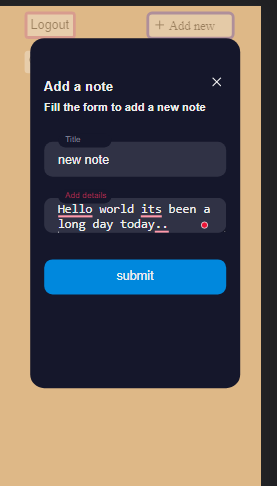
You can add some new notes using the Add new button, as shown below:
Once you do, you'll see that they show up on your dashboard as you add them.
Let's now logout of this user account and login as an admin user. So login using the email that you've assigned the admin role on Auth0. Once you do this would use the AllNotes index that we created earlier on for the writer_admin role on Fauna to fetch all notes and load them on the admin dashboard, as shown below:
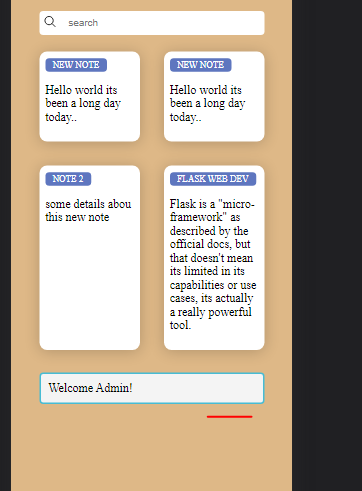
The UI is quite similar to the regular user's interface, but you can observe that it fetches all the notes and loads them on the user interface. This is only an example to show you what is possible using RBAC with Auth0 and Fauna, you are at liberty to customize these as much you want.
Conclusion
This article has covered quite a number of things, ranging from creating an application on Auth0 and a database on Fauna to setting up roles, permissions and creating an access provider on Fauna to receive custom tokens from a third-party provider like Auth0. We have seen how to properly configure our Auth0 and FaunaDB client instances so that they can function properly in these contexts. Lastly, we saw how to deploy an expressJs server to Heroku and deployed the frontend of the platform to Netlify.
You can find the code for the demo app here. Hopefully, this article has given opened your eyes to the possibilities of using serverless technologies like Auth0 and Fauna to fast-track your development process. Happy building!.


