TL;DR: In this article we'll attempt to cover a comprehensive security strategy for web applications to protect against common threats in web application security and mitigate their impact.
Introduction
Whether you manage your own infrastructure or not, having robust infrastructure security is great. But it becomes a bit redundant if your client's data is just as exposed through your web applications. Having infrastructure security is important, but there are considerations for front and backend developers that must be considered.
In this era of modern web technology, security should not be a band-aid or an after-thought. It should be at the very foundation of planning, managing and building your web applications.
But it doesn't stop there.
Web application security is an ongoing and ever-changing climate you do not want to be caught short.
You must continuously monitor, and work, to ensure that your company doesn't become another statistic in the world of security breaches. Regardless of programming language or framework, there are plenty of generic security practices you could follow from the very start of any project.
In this article I'll introduce you to my biggest tips for top to bottom (Front end to Back end) security for your web applications.
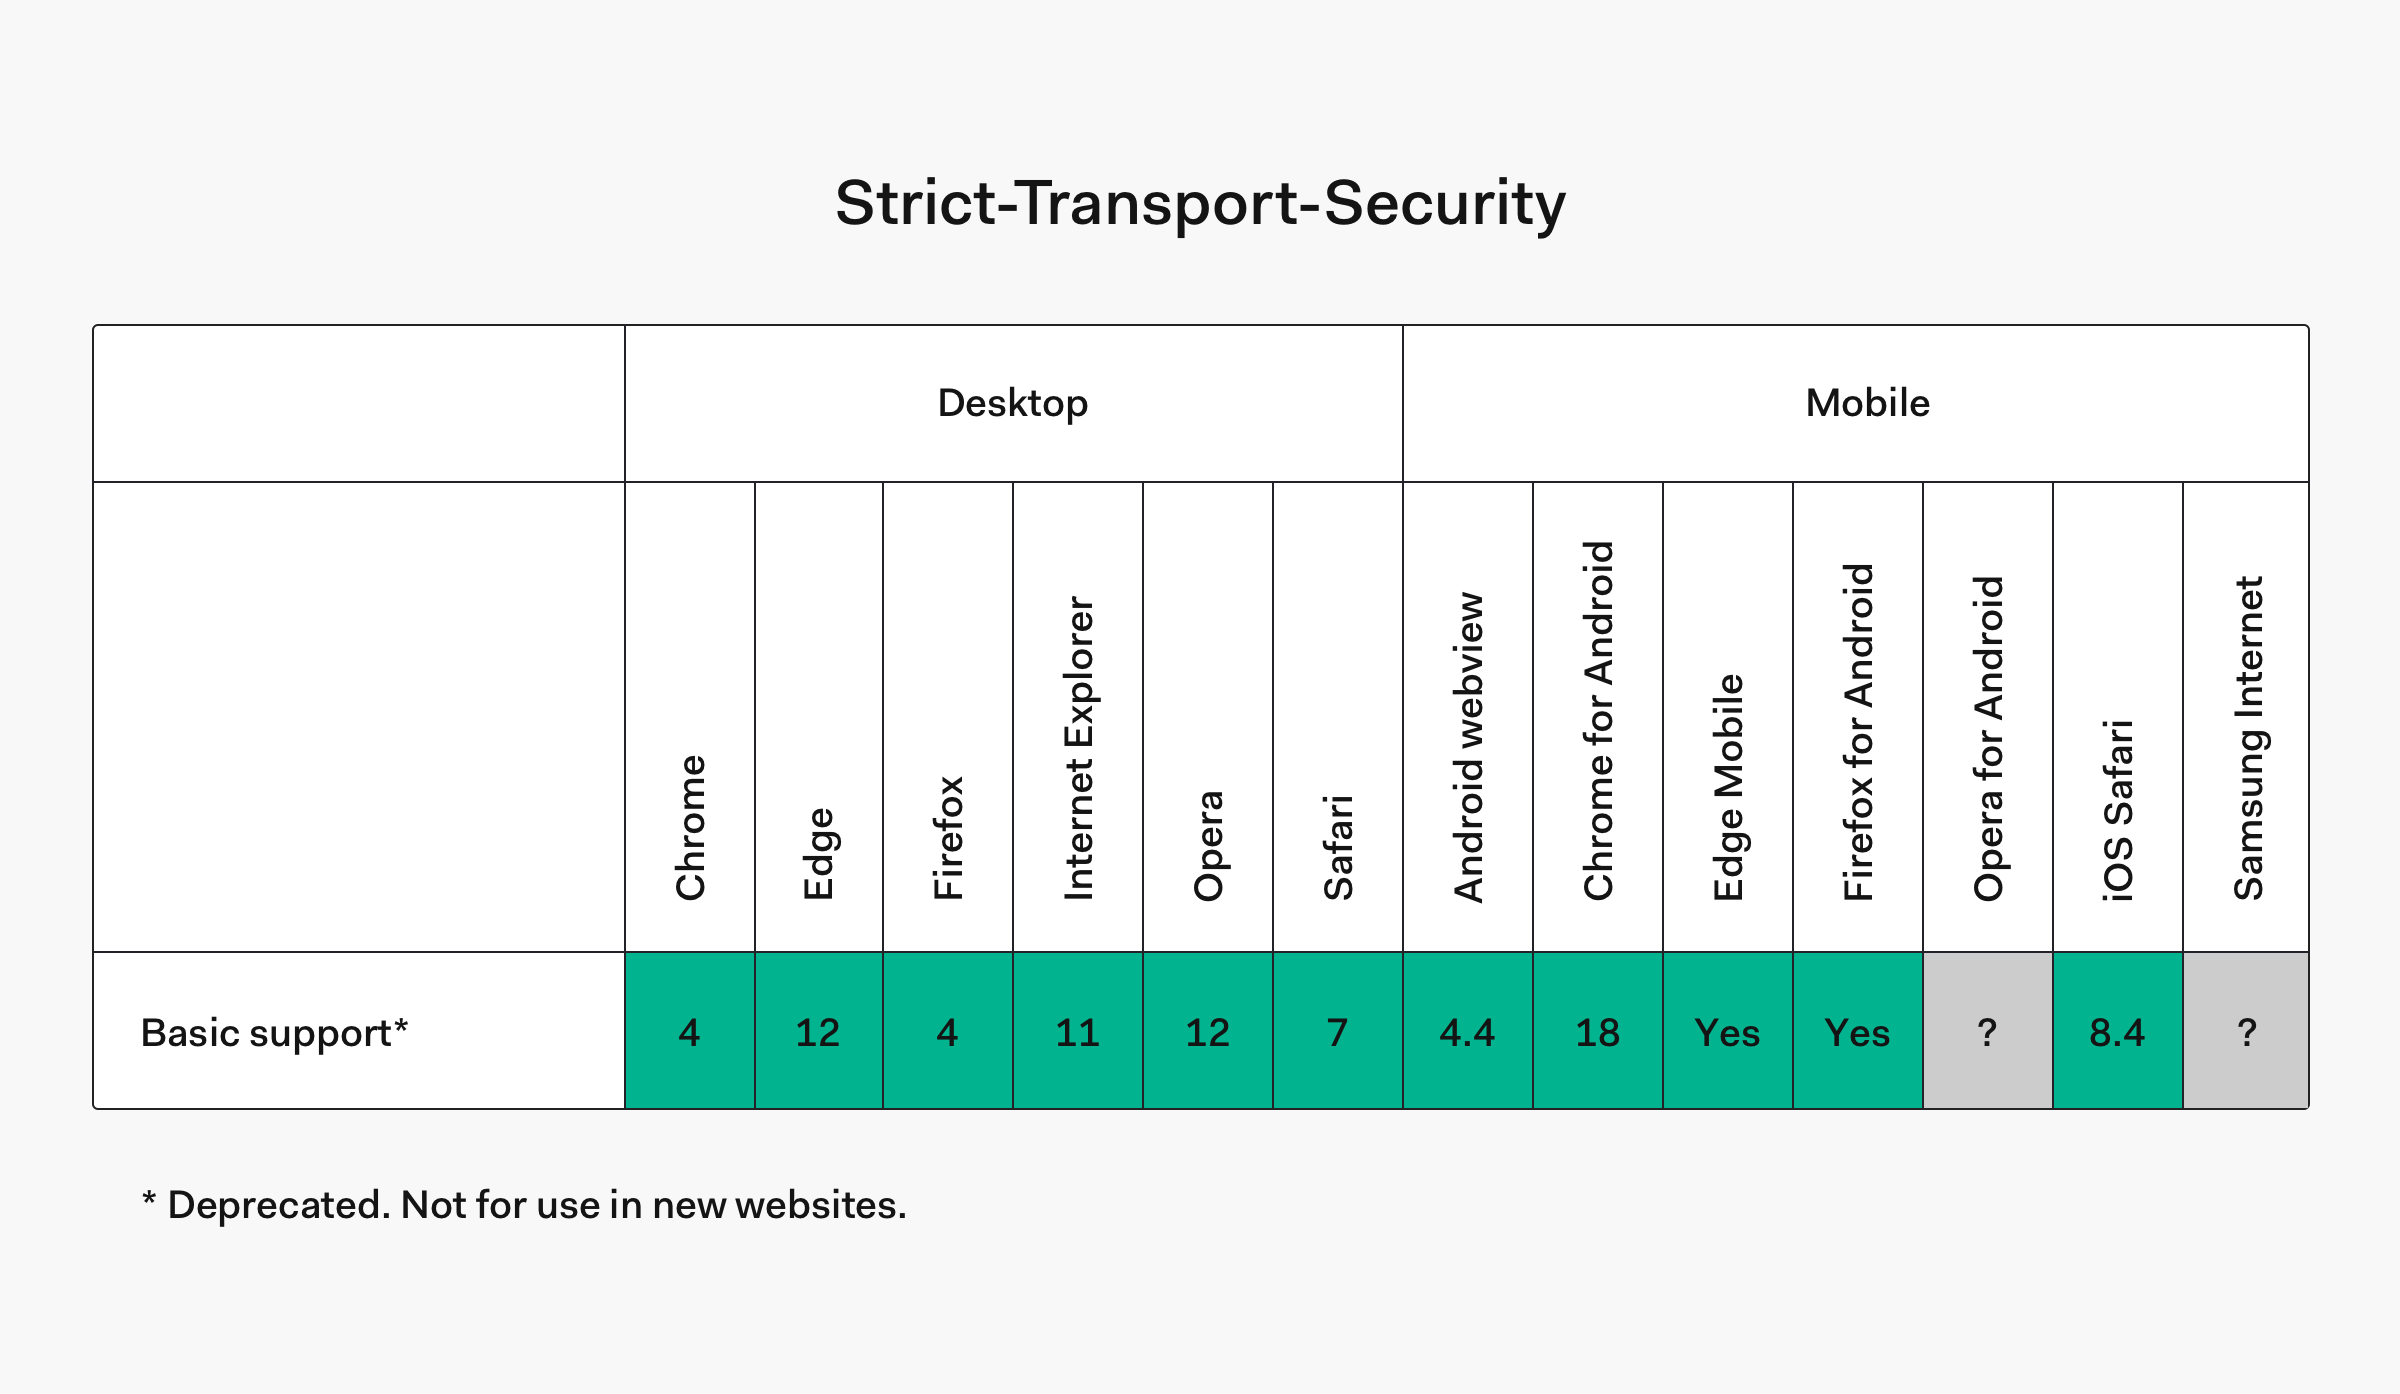
HTTP Strict Transport Security (HSTS) header
HSTS is a header you can provide the browser that enforces HTTPS across your entire web application.
There is no excuse these days to land on a website that isn't encrypting the communication between your web browser and their servers. While SSL certificates used to be a marketing tool for corporations to prove how safe they were, these days SSL certificates are both free and easy to get. Certificate authorities like Let's Encrypt have the backing of some of the world's best known companies, because a secure internet is better for everyone!
"There is no excuse for insecure web traffic these days! With the likes of @letsencrypt, free and easy to use SSL certificates are available to the masses!"
Tweet This
Simply owning an SSL certificate will not make your web application secure. You need to tell your application how to force traffic through it. Some websites do this with a HTTP redirect, but providing as HSTS header is just as effective, without that overhead.
Here are some examples of a HSTS header.
Strict-Transport-Security: max-age=630720; includeSubDomains; preloadTo see if it's set on a site with a CURL request:
curl -s -D- https://paypal.com | grep Strict-Transport-SecurityAnd to set it in Node.js response:
function requestHandler(req, res) {
  res.setHeader('Strict-Transport-Security', 'max-age=630720; includeSubDomains; preload');
}
"If a website accepts a connection through HTTP and redirects to HTTPS, visitors may initially communicate with the non-encrypted version of the site before being redirected, if, for example, the visitor types http://www.foo.com/ or even just foo.com. This creates an opportunity for a man-in-the-middle attack. The redirect could be exploited to direct visitors to a malicious site instead of the secure version of the original site." – developer.mozilla.org
In this example of a HSTS header, we have three directives. max-age, includeSubDomains and preload.
max-age=<expire-time>The time, in seconds, that the browser should remember that a site is only to be accessed using HTTPS. This means that the browser will automatically use HTTPS to access the site for as long as
max-agehas not expired.includeSubDomainsOptionalIf this optional parameter is specified, this rule applies to all of the site's subdomains as well.
preloadOptionalGoogle maintains a HSTS preload service. Most modern browsers support (or intend to support) this service and if your site is registered, it will never contact the service through insecure HTTP requests. It will assume the site uses HTTPS before it ever connects.
Note: If you start to use HSTS and your site has not been setup with HTTPS certificates then your site would become unreachable.
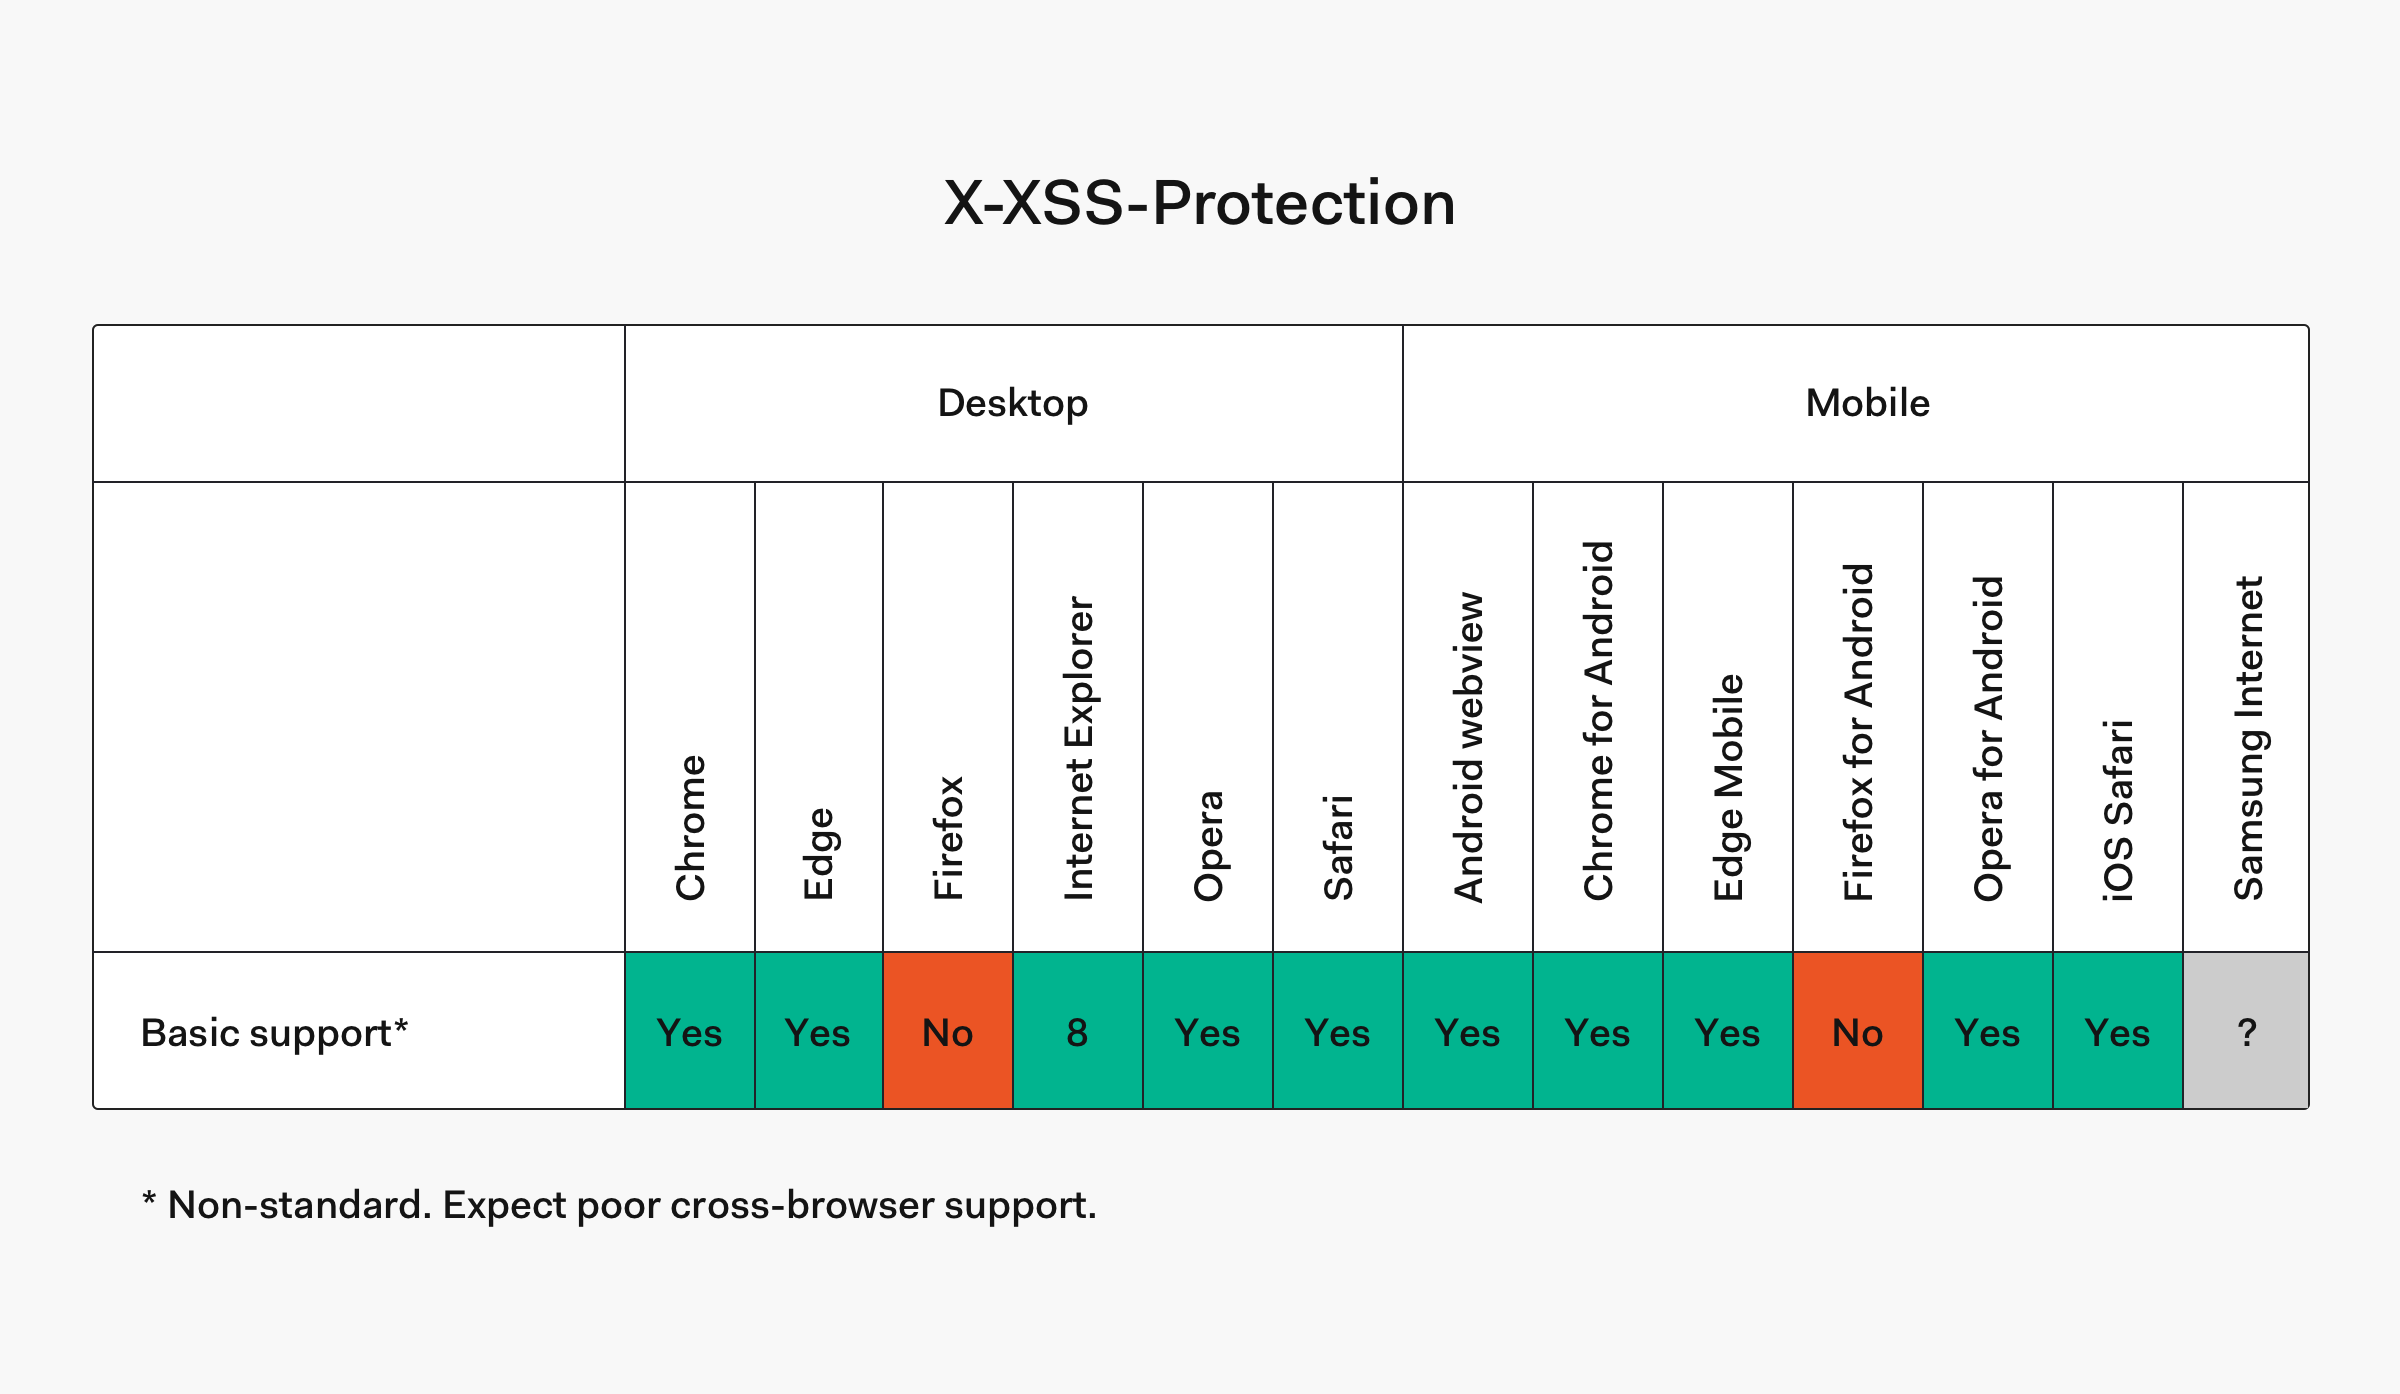
X-XSS-Protection header
XSS (Cross Site Scripting) is the most common of all web application attacks.
XSS occurs when malicious scripts are injected into otherwise trusted web applications. Most modern browsers come prepared to protect against XSS. We can ensure this is enabled by sending the X-XSS-Protection header.
Note:
X-XSS-Protectionheader is not available in Firefox and has been rendered entirely redundant by the Content Security Policy header, which we detail below.
Here are some examples of an X-XSS-Protection header.
X-XSS-Protection: 1; mode=blockAnd to set it in Node.js response:
function requestHandler(req, res) {
  res.setHeader('X-XSS-Protection', '1; mode=block');
}
In this example of a XSS header, we have three directives. 1 and mode. Also one missing one,report.
1This is basically a boolean value that determines whether XSS filtering is enabled. Change it to
0to disable it. Without the optionalmodeorreportdirectives, the browser will just sanitize the page, even removing the affected parts.mode=blockOptionalEnables XSS filtering. Rather than sanitizing the page, the browser will prevent rendering of the page if an attack is detected.
report=<report url>Enables XSS filtering. If a cross-site scripting attack is detected, the browser will sanitize the page and report the violation.
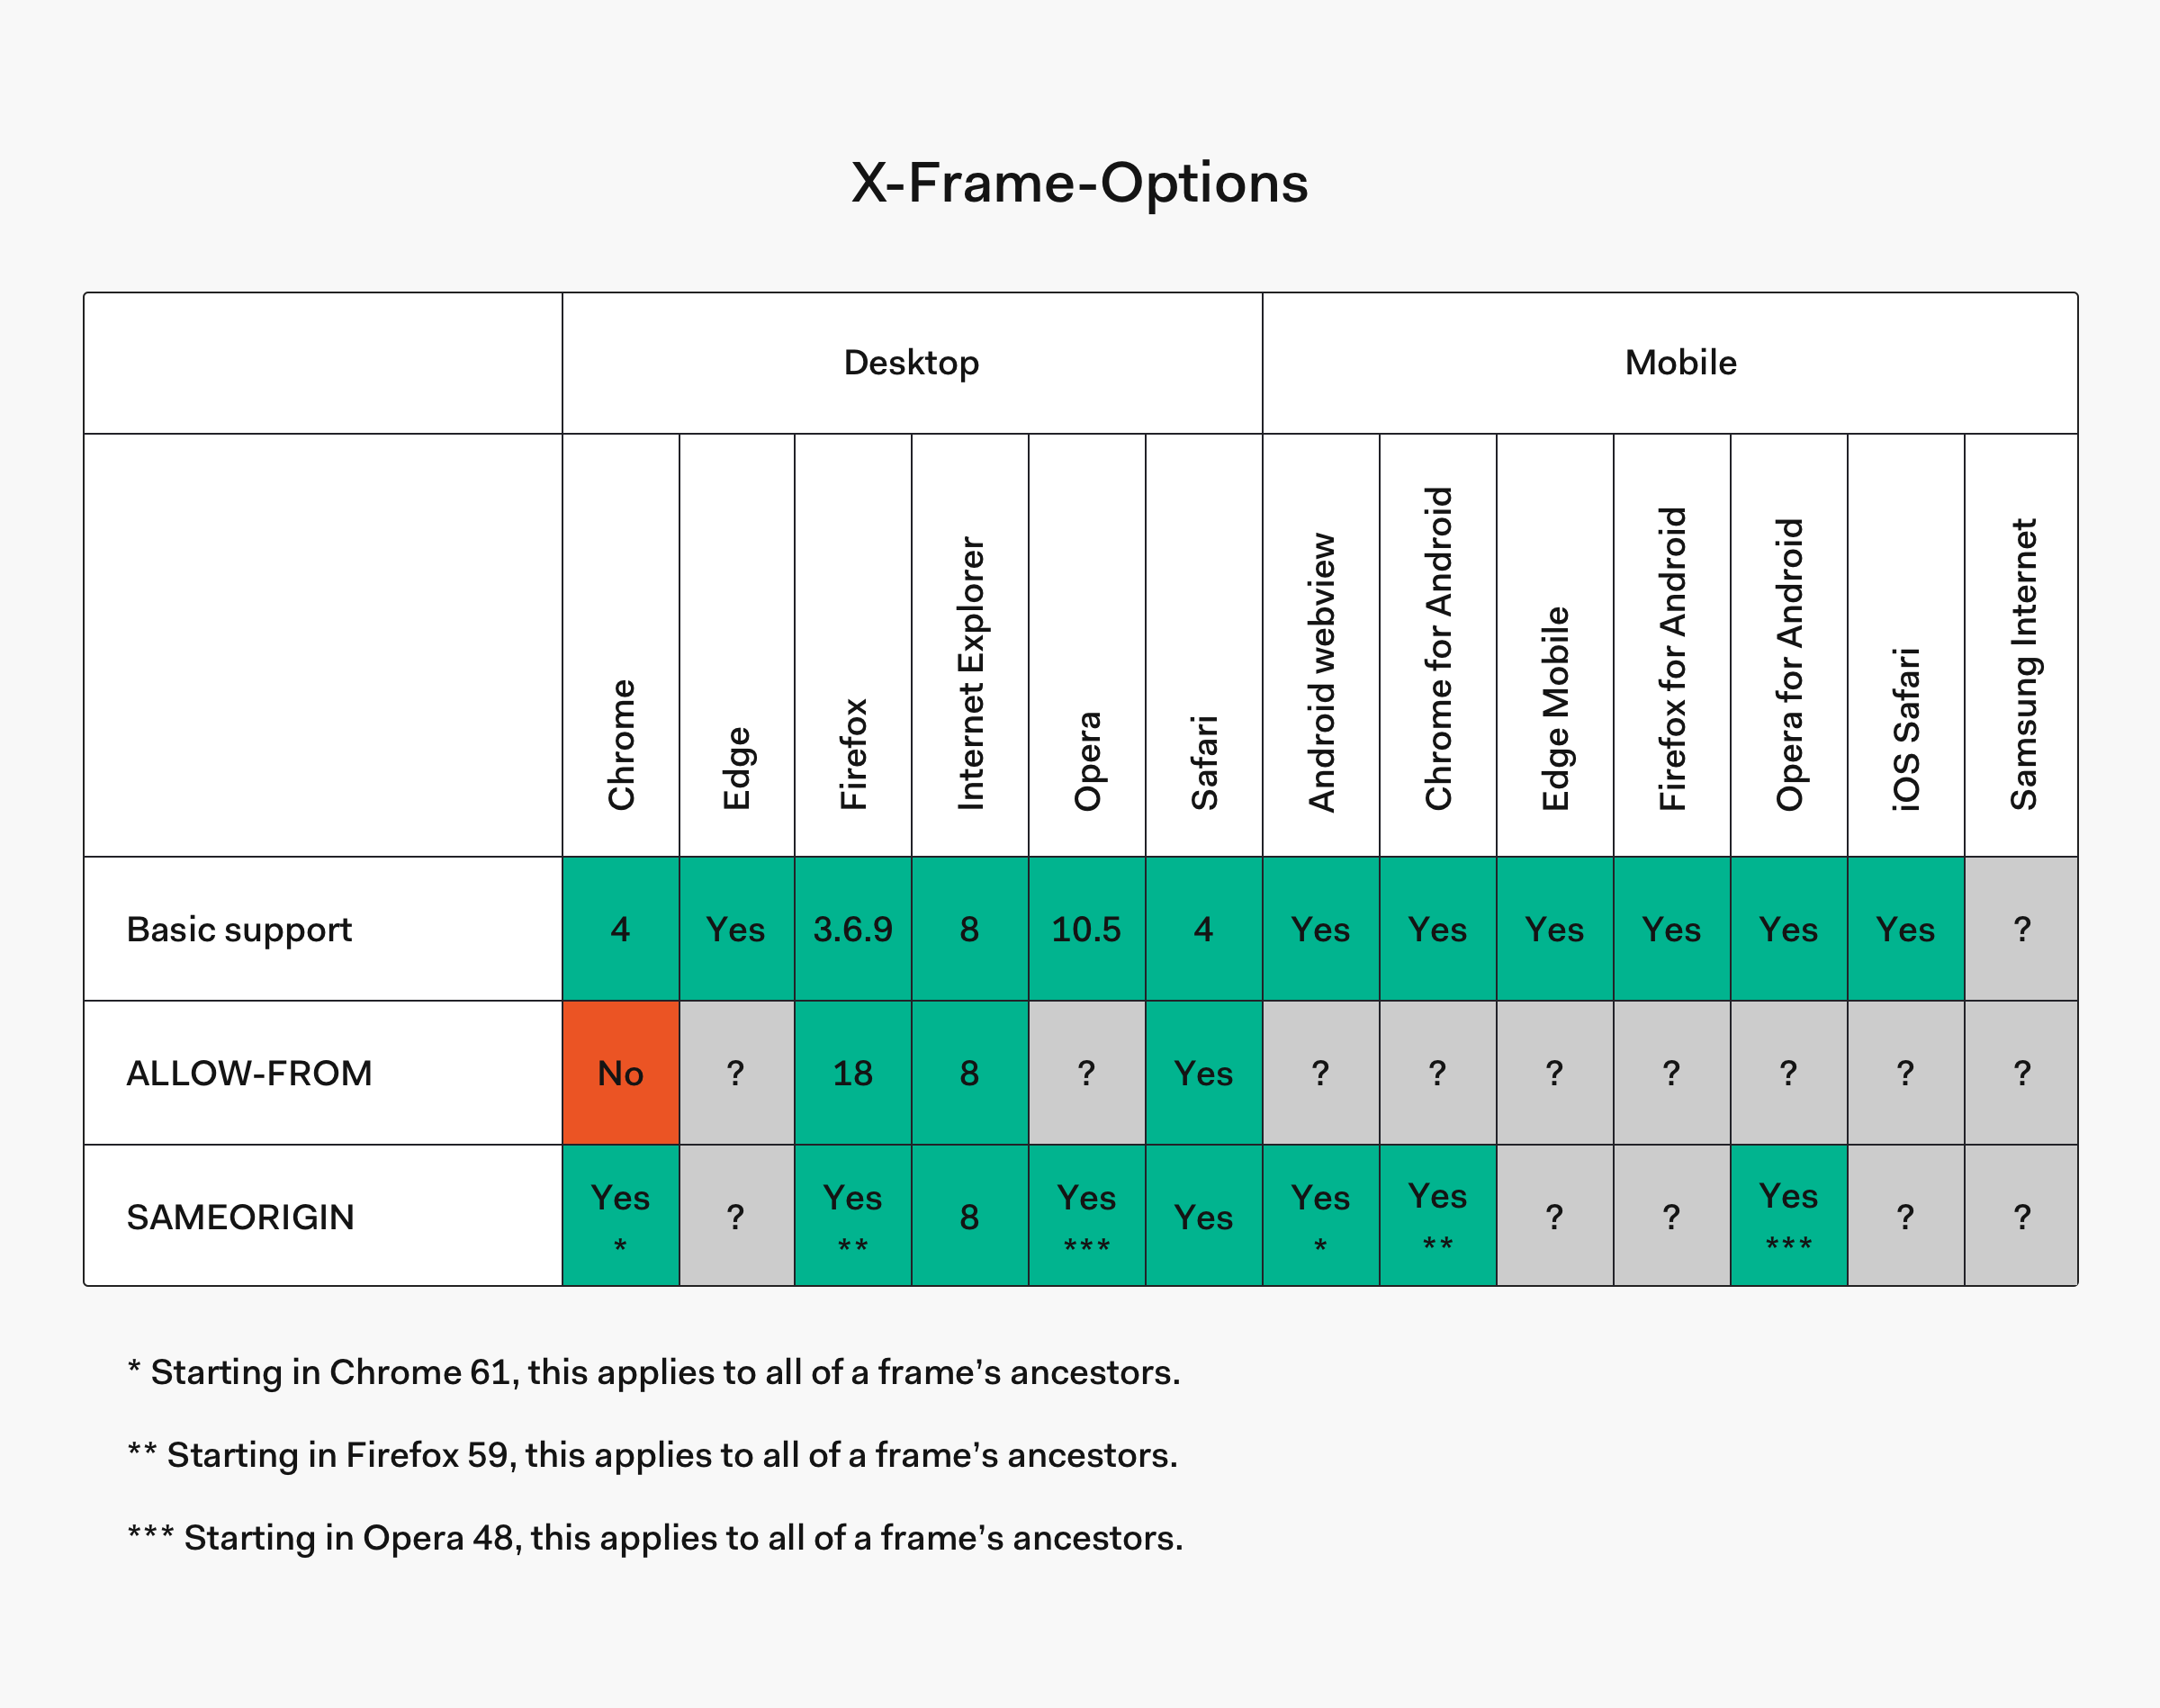
X-Frame-Options header
Clickjacking occurs when an attacker injects transparent or opaque objects into your web application. These might be an invisible layer over other functionality or designed to look like part of your application. Similar methods can be used for hijacking text boxes, to make you think you're putting your personal details or payment info (or both) into the application you're using!
One of the most famous examples of Clickjacking was against the Adobe Flash plugin settings page. The infected application was loaded into an invisible window and tricked the user into relaxing their security settings, like allowing the web application to use your camera or microphone!
To prevent click jacking, there is another header!
Servers offer Browsers a Header Protocol named X-Frame-Options. This protocol allows us to specify domains to accept iFrames from. It also allows us to state which sites our web application can be embedded on.
Here are some examples of an X-Frame-Options header.
X-Frame-Options: SAMEORIGINAnd to set it in Node.js response:
function requestHandler(req, res) {
  res.setHeader('X-Frame-Options', 'SAMEORIGIN');
}
With this header, we get three possible directives. DENY, ALLOW-FROM, and SAMEORIGIN.
DENYThis blocks all framing.
ALLOW-FROMThis allows you to provide a list of domains to allow framing within.
SAMEORIGINThis means framing is only allowed within the current domain.
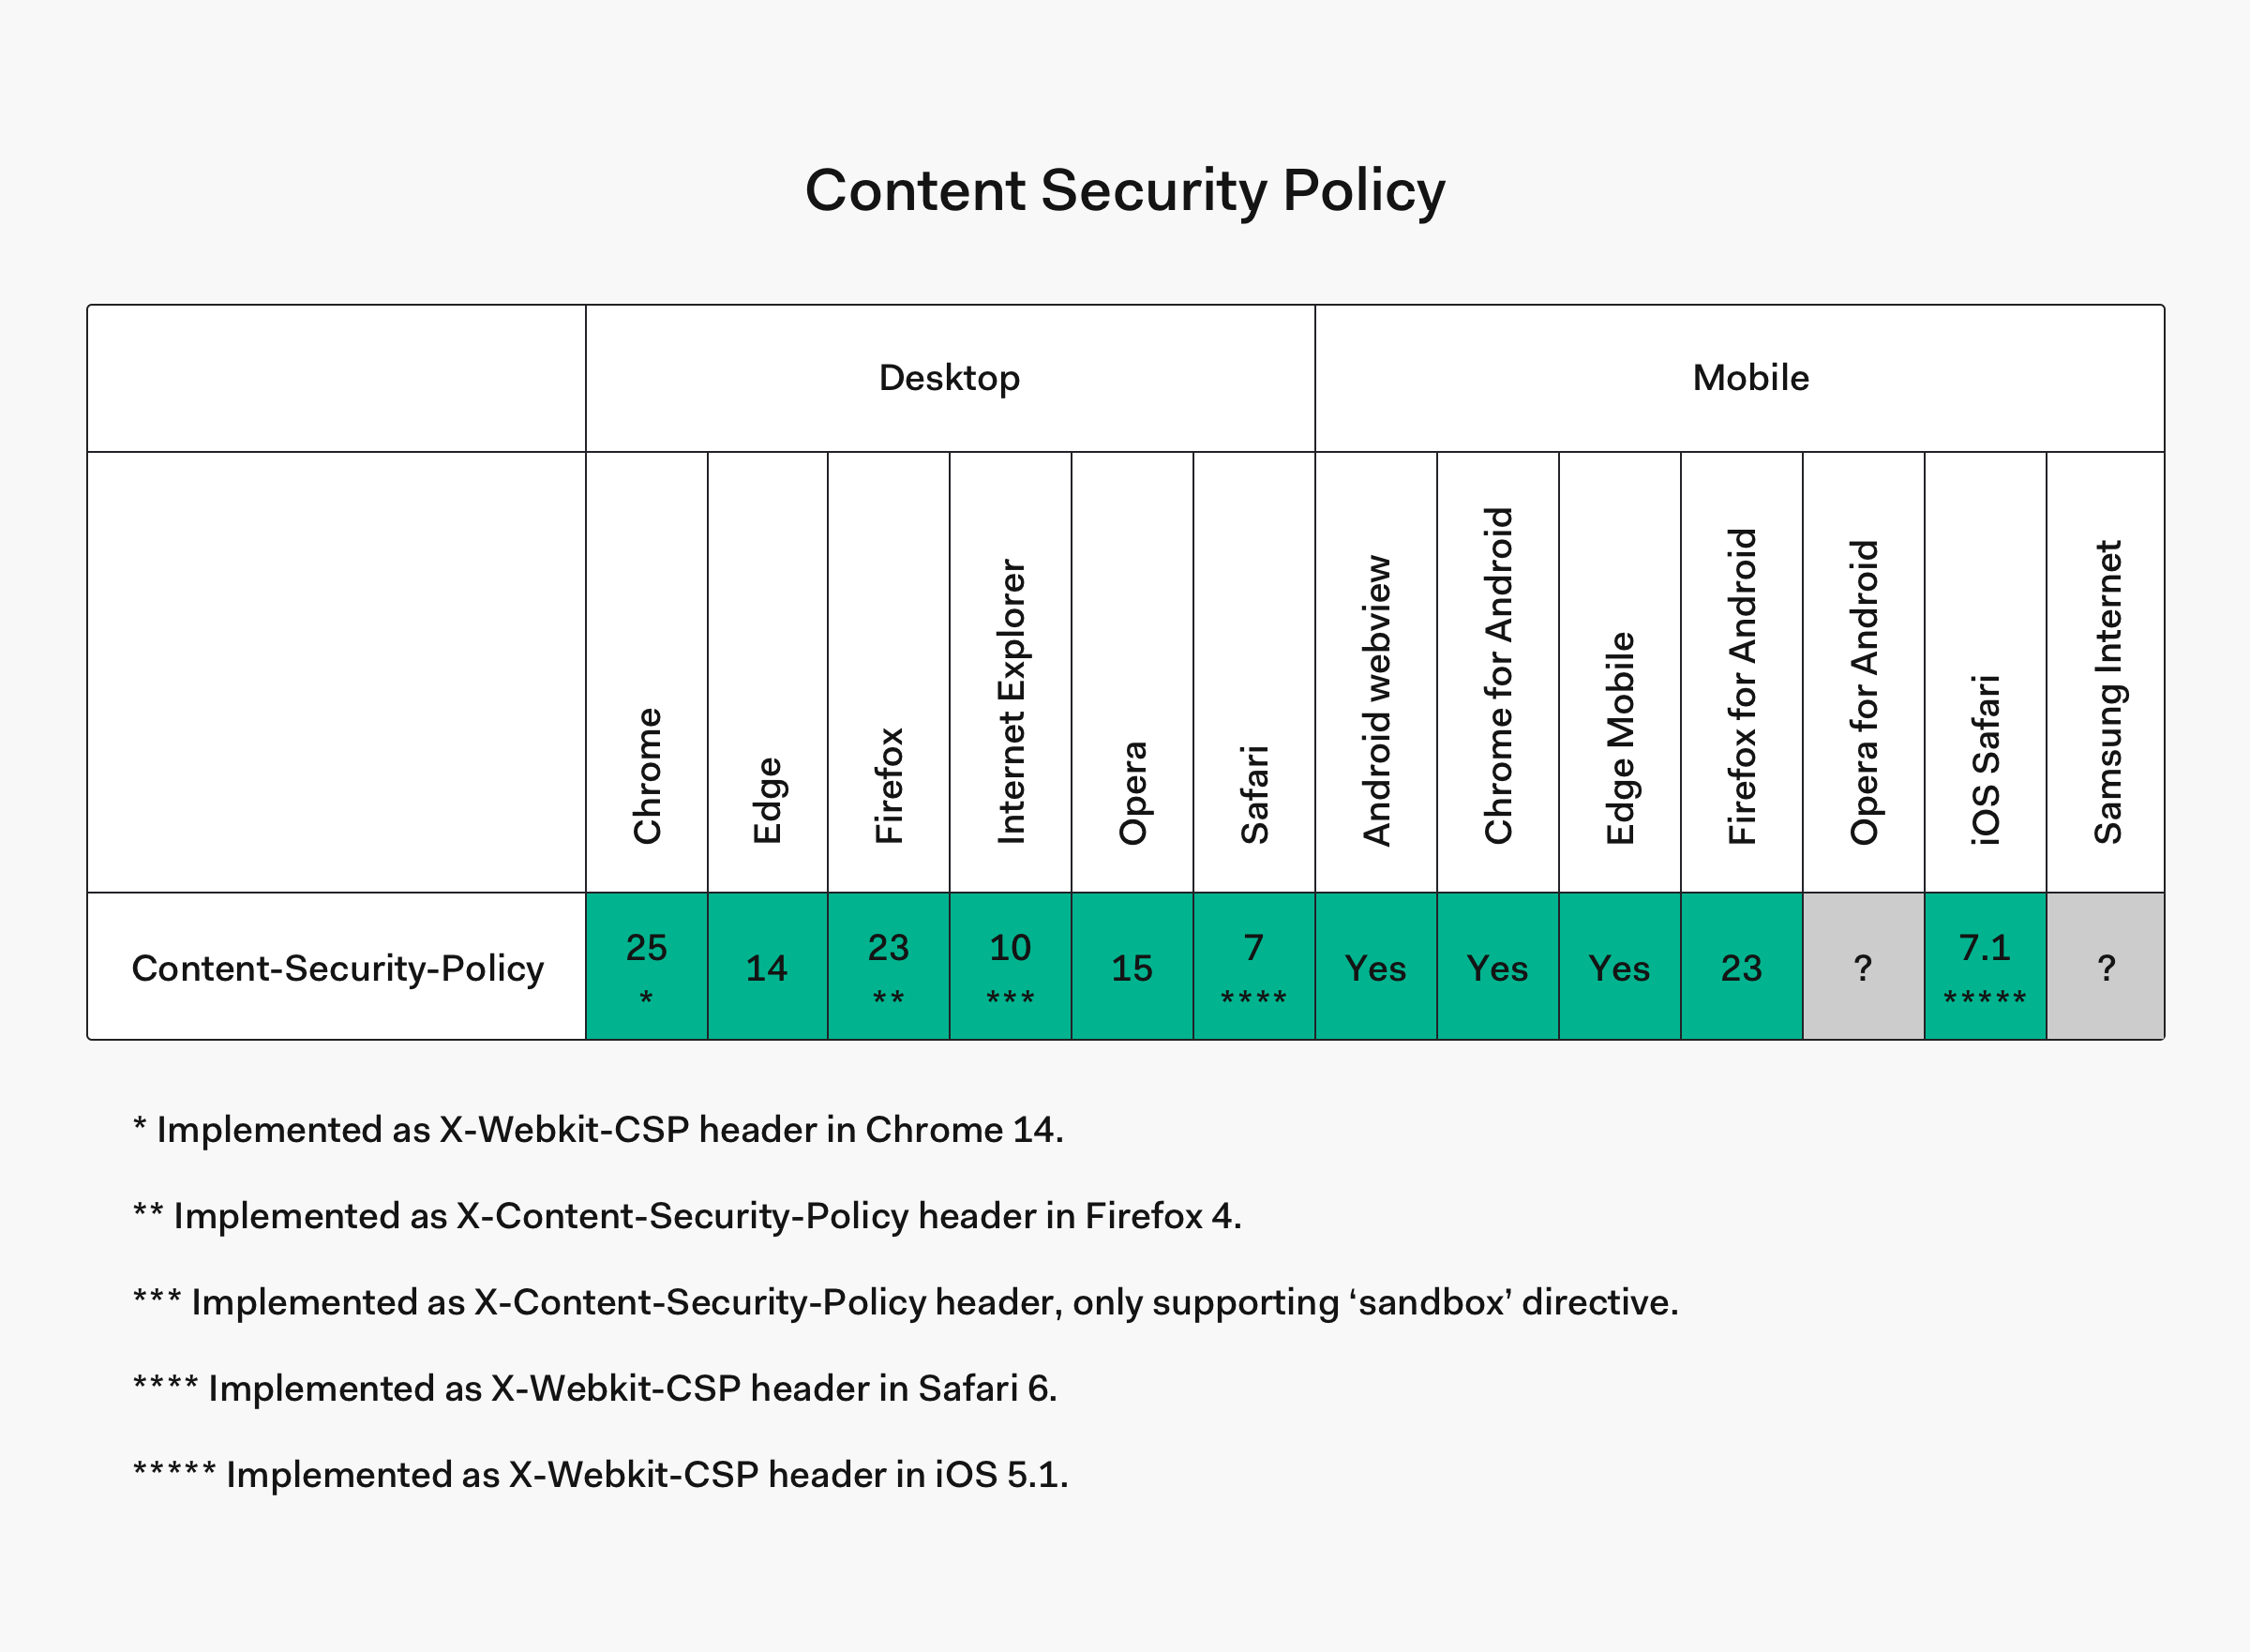
Content Security Policy (CSP) header
CSP is a more modern layer of security that helps detect and mitigate more than one kind of attack, including XSS and data injection attacks.
Designed to be fully backwards compatible, browsers that don't support it will still work with servers using it, by ignoring it and defaulting to the standard same-origin policy for web content.
It works by telling the browser exactly which URLs content on your site should be loaded from.
To include a CSP header that allows only internal and Google Analytics, in an Express.js server, you could do the following:
const express = require('express');
const app = express();

app.use(function(req, res, next) {
    res.setHeader("Content-Security-Policy", "script-src 'self' https://analytics.google.com");
    return next();
});

app.use(express.static(__dirname + '/'));

app.listen(process.env.PORT || 3000);
However, if we do not wish to allow any external sites to execute scripts on our web application, we could simply include the following:
function requestHandler(req, res) {
    res.setHeader( 'Content-Security-Policy', "script-src 'self'" );
}
Note the script-src directive here, that we have set to self, therefore only allowing scripts from within our own domain. Content Security Policies are both excellent and very powerful, but must be used cautiously. Just as with HSTS, incorrect configuration could cause unforeseen issues or missing content. This will also disable inline JavaScript unless it's provided unsafe-inline keyword, a hash like ('sha256-OsJINy4ZgkXN5pDjr32TfT/PBETcXuD9koo2t1mYDzg='), or a nonce ('nonce-...'), which is great for security!
Cross Site Request Forgery (CSRF)
Cross Site Request Forgery is an attack where by the attacker impersonates an authorized user and makes requests on their behalf, like resetting a password, or updating an email address.
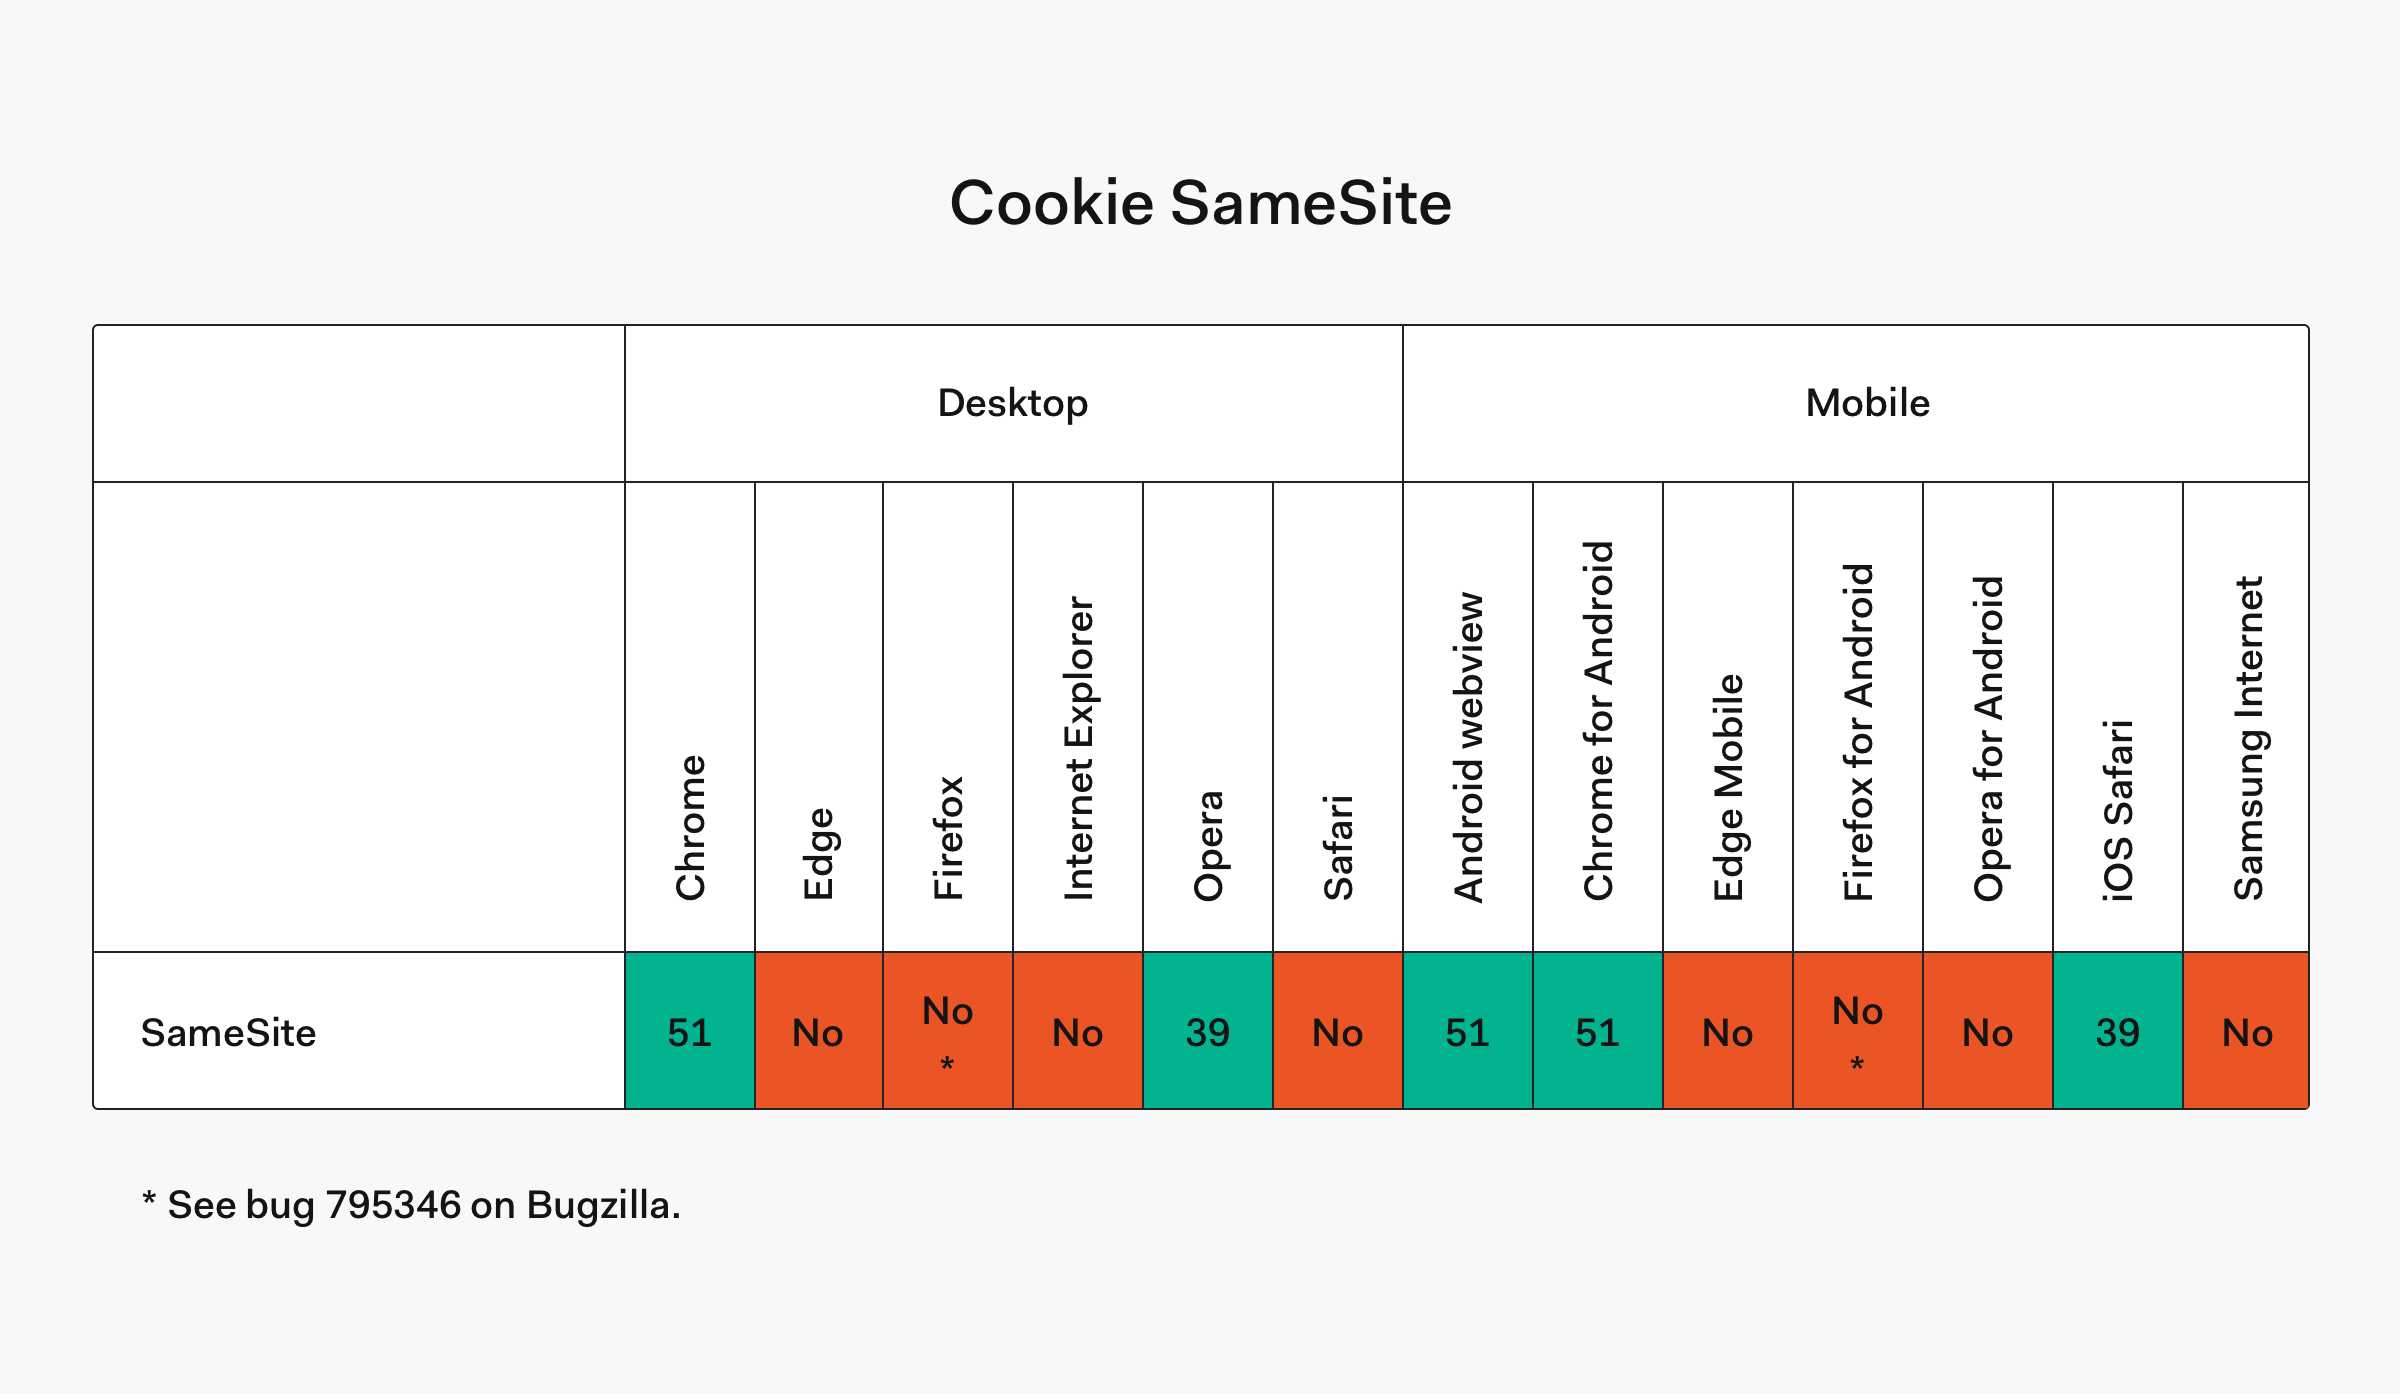
We've been mitigating CSRF requests for years by checking HTTP headers such as the Origin and Referer. Whilst these do work, we have a new defence against CSRF. The SameSite cookie directive. SameSite is relatively new and has only been around for a year or so. But it's still widely unknown. Once applied, prevents the browser from sending this cookie along with cross-site requests
An example of the SameSite directive:
Set-Cookie: sess=sessionid123; path=/; SameSiteCookies
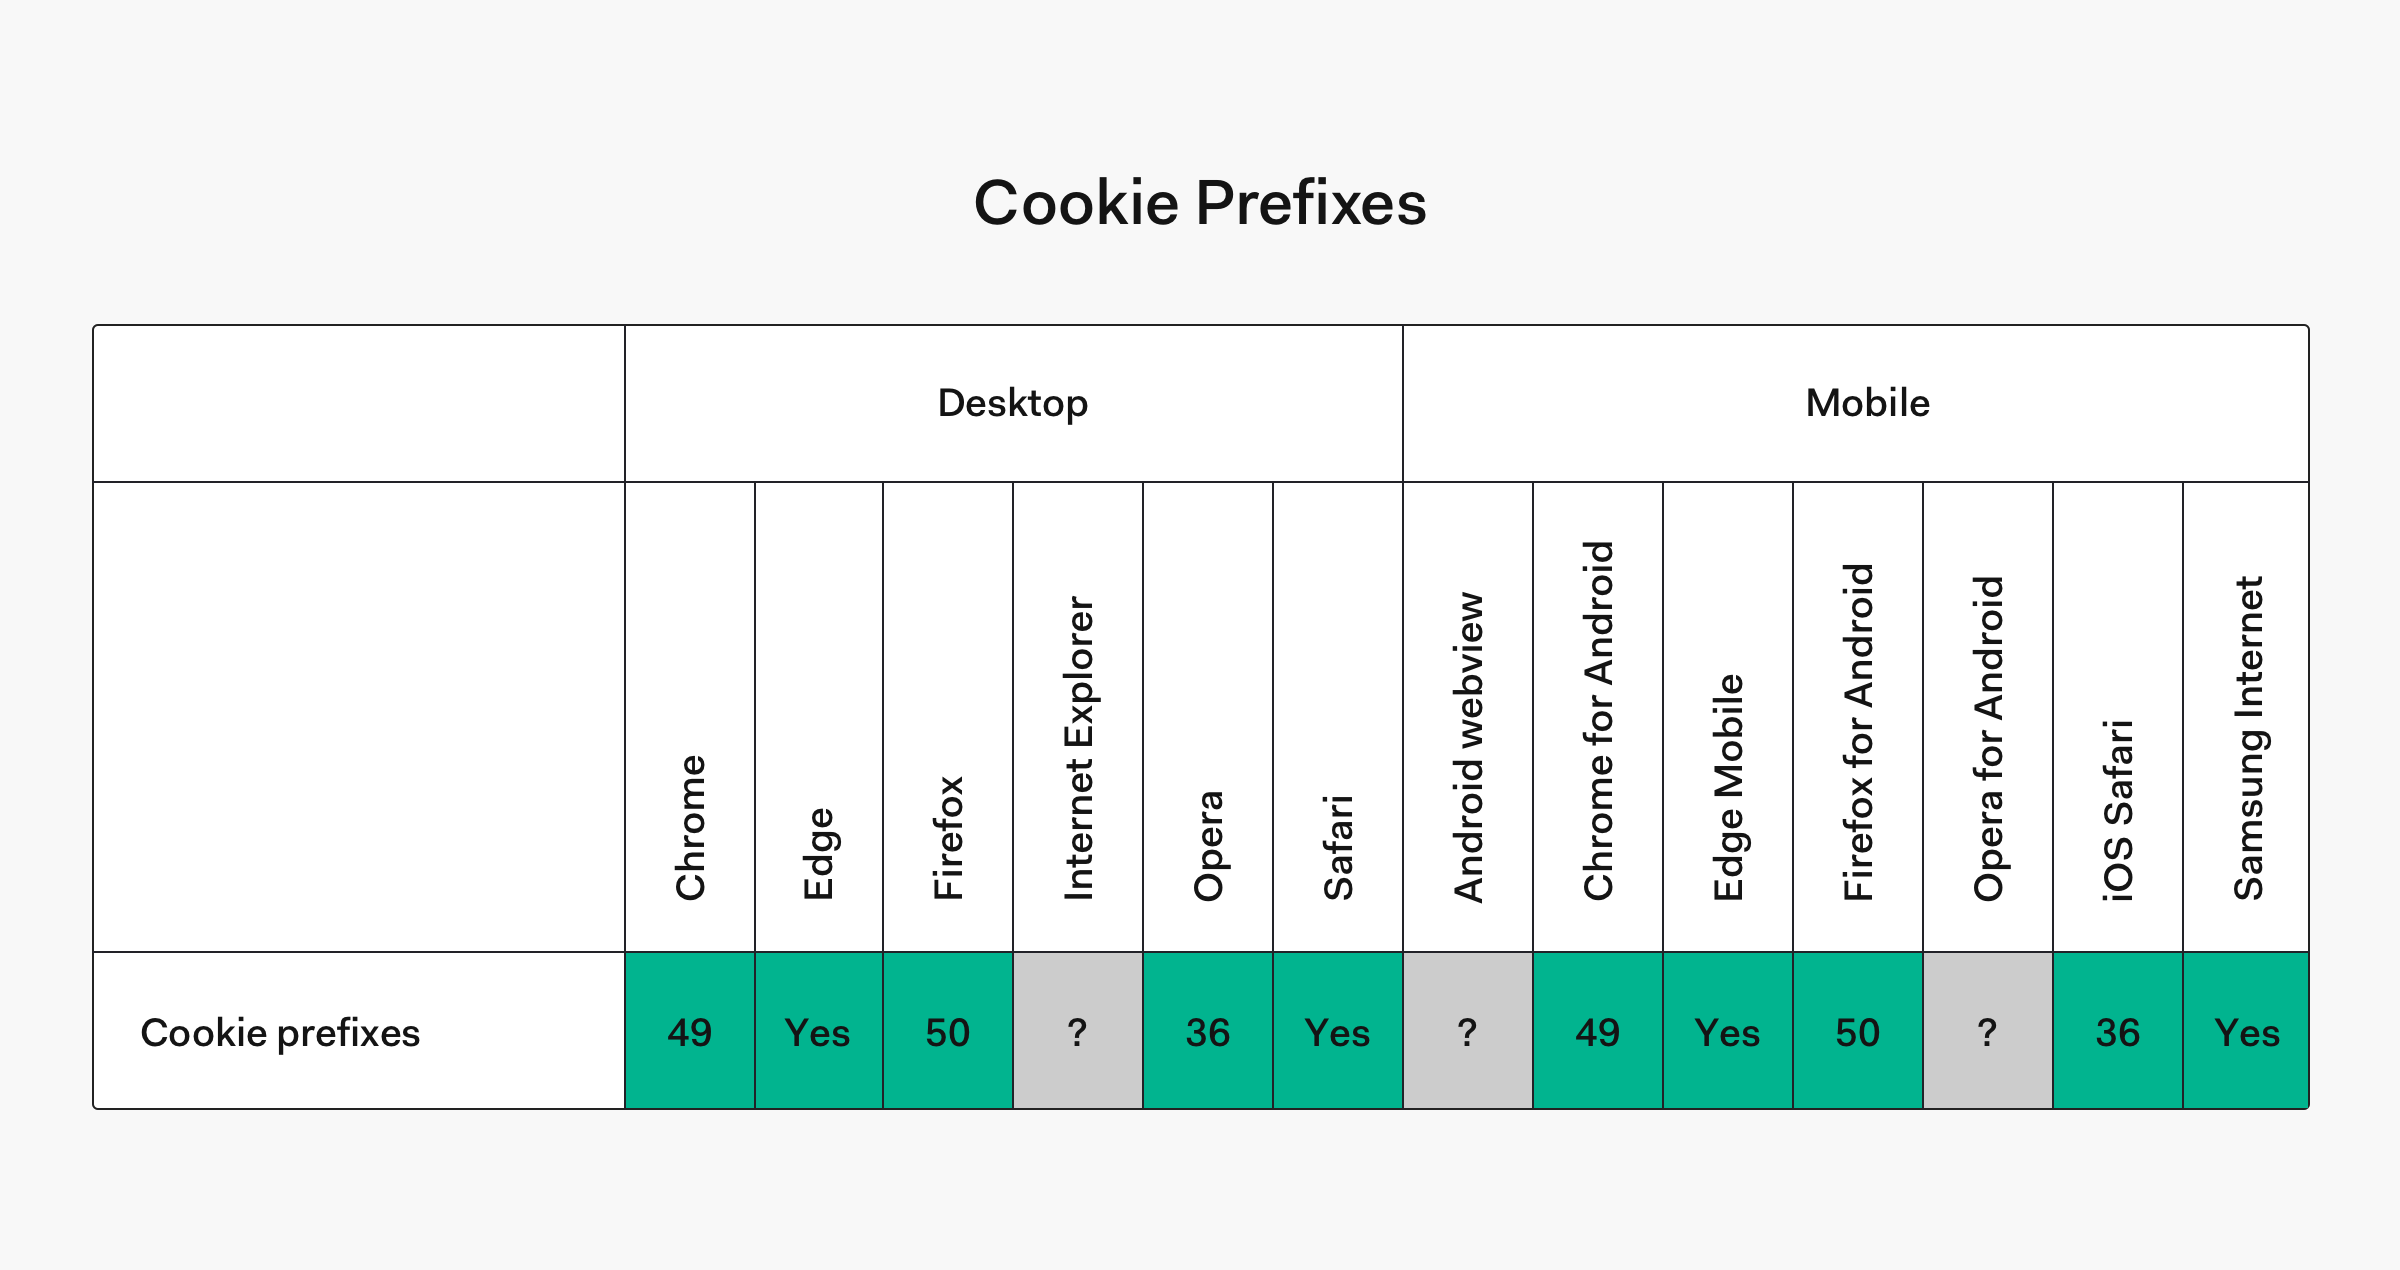
Cookies are an important feature of web applications, usually carrying our users session identification, so the server knows you're you on each request. The SameSite directive might be a good way to protect your session information, but Cookie Prefixing is a new and under utilized method to ensure a cookie is absolutely secure.
Some user agent implementations support the following cookie prefixes:
__Secure- Tells the browser that it should only include the cookie in requests that are sent over secure channel.
__Host- Tells the browser not only that it should only include the cookie in requests that are sent over secure channel, this will also tell the browser to only use the cookie from a secure origin and the scope is limited to a path attribute passed down by the server. If the server omits the path attribute the "directory" of the request URI is used. It also signals that the domain attribute must not be present, which prevents the cookie from being sent to other domains.
Effectively a __Host cookie is very specific to where it was intended to be used and therefore should be considered the most secure way to define one.
Conclusion
The most effective method for maintaining the security of your web applications is keeping up-to-date with vulnerabilities. They're a dynamic topic in a dynamic environment and the attacker is always one step ahead.
Complacency is the enemy. The moment you relax and think you're safe, you're going to miss an opportunity to improve security on your web application.
By following the advice in this article, staying up-to-date with announcements, and having an in-depth knowledge of your systems, you can rest assured that you're doing what you can to mitigate attacks.
Many developers and organizations ignore security altogether. It does not take an entire development team to implement the changes in this article, but it does take a certain investment in time and culture to know you're working towards protecting your data.
So, from enforcing HTTPS with Strict Transport Security, to securing our web application with a Content Security Policy header, we're well on our way to ensuring the security of our web applications.
Aside: Auth0 Authentication with JavaScript
At Auth0, we make heavy use of full-stack JavaScript to help our customers to manage user identities, including password resets, creating, provisioning, blocking, and deleting users. Therefore, it must come as no surprise that using our identity management platform on JavaScript web apps is a piece of cake.
Auth0 offers a free tier to get started with modern authentication. Check it out, or sign up for a free Auth0 account here!
Then, go to the Applications section of the Auth0 Dashboard and click on "Create Application". On the dialog shown, set the name of your application and select Single Page Web Applications as the application type:
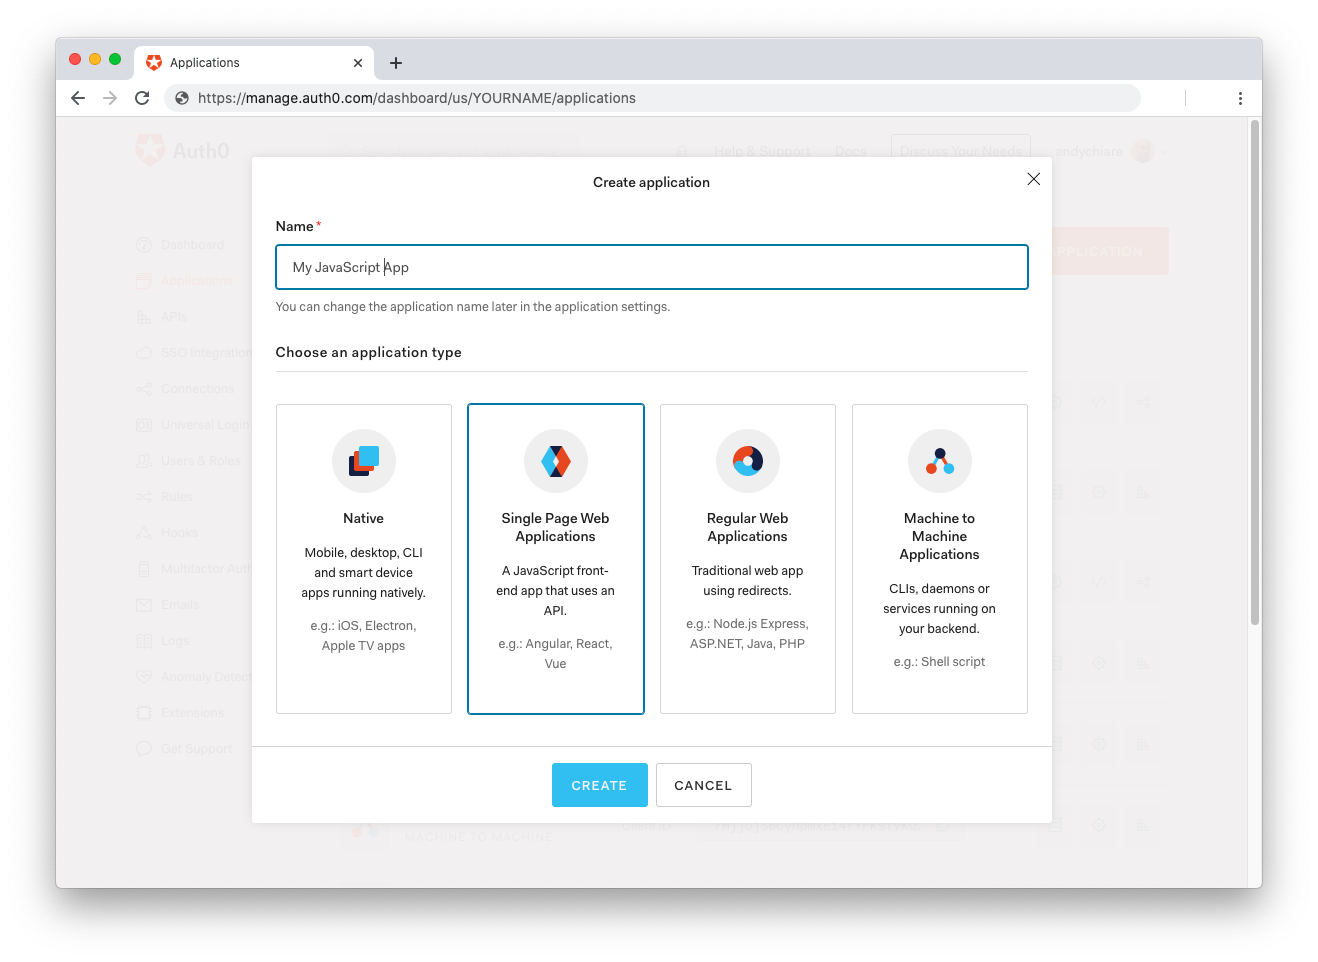
After the application has been created, click on "Settings" and take note of the domain and client id assigned to your application. In addition, set the Allowed Callback URLs and Allowed Logout URLs fields to the URL of the page that will handle login and logout responses from Auth0. In the current example, the URL of the page that will contain the code you are going to write (e.g. http://localhost:8080).
Now, in your JavaScript project, install the auth0-spa-js library like so:
npm install @auth0/auth0-spa-jsThen, implement the following in your JavaScript app:
import createAuth0Client from '@auth0/auth0-spa-js';

let auth0Client;

async function createClient() {
  return await createAuth0Client({
    domain: 'YOUR_DOMAIN',
    client_id: 'YOUR_CLIENT_ID',
  });
}

async function login() {
  await auth0Client.loginWithRedirect();
}

function logout() {
  auth0Client.logout();
}

async function handleRedirectCallback() {
  const isAuthenticated = await auth0Client.isAuthenticated();

  if (!isAuthenticated) {
    const query = window.location.search;
    if (query.includes('code=') && query.includes('state=')) {
      await auth0Client.handleRedirectCallback();
      window.history.replaceState({}, document.title, '/');
    }
  }

  await updateUI();
}

async function updateUI() {
  const isAuthenticated = await auth0Client.isAuthenticated();

  const btnLogin = document.getElementById('btn-login');
  const btnLogout = document.getElementById('btn-logout');

  btnLogin.addEventListener('click', login);
  btnLogout.addEventListener('click', logout);

  btnLogin.style.display = isAuthenticated ? 'none' : 'block';
  btnLogout.style.display = isAuthenticated ? 'block' : 'none';

  if (isAuthenticated) {
    const username = document.getElementById('username');
    const user = await auth0Client.getUser();

    username.innerText = user.name;
  }
}

window.addEventListener('load', async () => {
  auth0Client = await createClient();

  await handleRedirectCallback();
});
Replace the
YOUR_DOMAINandYOUR_CLIENT_IDplaceholders with the actual values for the domain and client id you found in your Auth0 Dashboard.
Then, create your UI with the following markup:
<p>Welcome <span id="username"></span></p>
<button type="submit" id="btn-login">Sign In</button>
<button type="submit" id="btn-logout" style="display:none;">Sign Out</button>
Your application is ready to authenticate with Auth0!
Check out the Auth0 SPA SDK documentation to learn more about authentication and authorization with JavaScript and Auth0.


